S U P E R C O F F E E

BULLETPROOF COFFEE

But First . . . . C O F F E E   : )

I think its safe to say that most of us start our day with a morning ritual of sorts. For me that is usually a trip to the kitchen for a fresh glass of water & to get the kettle going for my morning tea or coffee. First things First !! If you are anything like me you need that morning cup of whatever your secret potion is to kick start your day. About 54% of americans over the age of 18 drink coffee everyday, 65% of that consumption takes place in the early morning breakfast hours. And did you know that about 4 billion is spent each year importing coffee to the US !! So yeah I'm guessing I'm not alone in my love for the worlds largest commodity.  

I am very much into fitness & I love learning about nutrition & how to better care for my body. So when I first caught wind of this miracle coffee concoction I was super eager to give it a try. Bulletproof Coffee is also referred to as upgraded black coffee that is blended with superfood ghee & brain octane oil, similar to coconut oil. Popularized by Dave Asprey bulletproof is said to boost cognitive function, support your hormonal system & promote healthy weight loss.  Sounds good to me ! Here is how I prepare my bulletproof coffee. 

I start with organic fair trade beans from the Porto Rico Importing Co. located in Essex Market in the Lower East Side. They also have locations in Greenwich Village, The East Village & in Williamsburg, Brooklyn.  But any high quality coffee beans will do. 

I use a Moka Pot for brewing my fresh ground beans.  Fill bottom chamber with cold water.

Pack collecting chamber with coffee.

Brew . . . .

Once Coffee is done brewing pour into a blender. Add one teaspoon of Ghee & Coconut Oil. 

I use this GHEE

And this Coconut Oil 

Blend 

Enjoy sustained energy levels promoted by healthy fats in the creamiest, most delicious & highest octane cup of coffee.  

For more bulletproof recpies like this one be sure to visit me over at MozieMo.com 

Until Next time :) 

-X O X O 

Rachel Leigh 

MozieMo.Etsy.Com


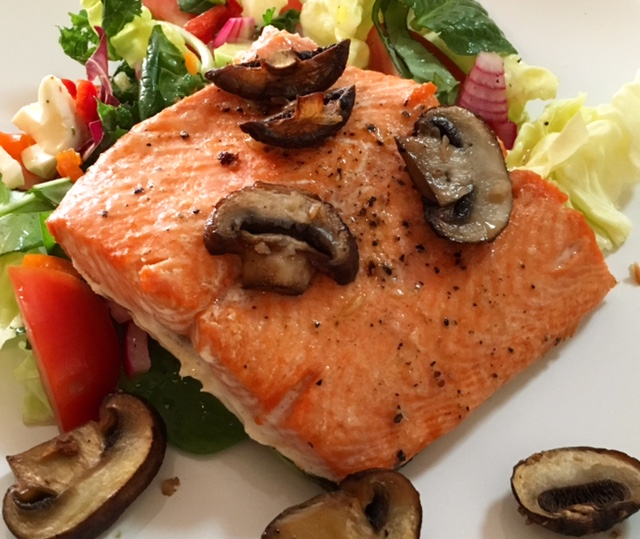
Quick and easy salmon recipe!

4 Ingredient Broiled Salmon

In honor of Mother’s Day, this goes out to all my fellow mompreneurs because we all know that dinner time is the hardest time of the day when you have little ones! Long gone are the days when I could cook up a meal for the hubby and I at my own leisure! 

Here is where I give a shout out to the G-MMas out there helping the tribe!

I am lucky that I live fairly close to my amazing mom and mother in law, the super troopers and providers of yummylicious, comfort food. My kiddos ADORE their meals!

With that said, Monday's are for reheating grandma's and mamá's meals and I keep it simple the rest of the week. I also try to keep it light and healthy. Today's recipes is one of my simplest recipes and totally delicious!

It is also my favorite; a four-ingredient broiled salmon. All you need to cook it is: extra virgin olive oil, sea salt and black pepper.

Broiling salmon is my favorite way to cook it. You can’t mess it up (well, unless you forget it in the oven of course, but that’s where cooking timers or phone alarms come in handy).

Here is the recipe: 

Prep time: 2 minutes

Cook time: 9 minutes

Serves 3 (or in our case 2 adults, 2 toddlers)

  • 1LB fillet of wild caught salmon
  • 1 tbsp EVOO
  • Salt and black pepper to taste (or approximately 1tsp salt a little less than that of black pepper)

Instructions: 

1- Preheat the oven on HI broil

2- Spray a pan with non stick spray.

3- Place your salmon fillet in the pan, drizzle both sides of the fillet with EVOO and add the salt and pepper to each side. Make sure your salmon fillet is laid out with the skin-side down. 

4- Broil in the preheated oven for 9 minutes. Serve with your favorite side dish! 

Post by: Loella Medina 

Mother's Day, May 8th, Gift Ideas

 Mother's Day is in one week, start shopping and buy local.   Send her on a journey with Rising Phoenix's Spa Kit.  For $85.00 this is what you get:

4.5 oz bar of Baseline - Unfragranced, Untinted, Uncomplicated handmade cured soap
• 16 oz jar of Spot of Tea - our famous foaming sugar scrub - in Lemon Chamomile
• 8 oz bottle of Inner Light - A light, yet luxe all over body (& hair) oil
• 12 oz jar of Renew - A whipped body creme that smooths on like a lotion but moisturizes like a body butter
• 8oz bottle of Featherweight - The lightest lotion you can imagine! Never greasy, never sticky. Just soft skin for days
• 4g tube of Morning Dew Lip Balm - 100% natural, for all the 'Thank You' kisses mom will be covering your face with!

And the cherry on top of this spa sundae? 
• A full 7oz Ignition Massage Oil Candle! When lit, this candle melts almost instantly into a pool of warm massage oil!

I love the retro feel of these cards from Gramkin Paper Studio. And to be totally honest, yea this is true! Ha!

Everyone uses keys, how about an adorable and cool key chain. Ye Old Stamping Ground will be at the F.A.D market this weekend in Boerum Hill Brooklyn. If you don't have time for shipping stop by on Sunday and scoop up some of these chains.  

And who does't love new jewelry! From Enmeshed Jewelry beautiful rain droplet sterling silver. 

Droplets from Enmeshed Jewelry $40

However you celebrate Mother's Day, just thank your loved one, caregiver, mom, grandma, or nanny.  

Happy Mother's Day to all the moms!

Tracey

www.traceytoole.com  |   www.traceytoole.etsy.com

Desert of the Month: Chocolate Cake with Homemade Caramel Drizzle

Whether it is Chocolate, Vanilla or Fruit flavored we all love something sweet, and being able to bake it at home is just an added bonus. The best part about this recipe is that it can be made in a pinch.

My Chocolate Cake with Homemade Caramel Drizzle uses ingredients you probably already have in your kitchen, or after you read this they will become new staples.

My favorite part about making this cake is that it truly is a one-bowl recipe, the ease of a boxed cake with the taste of homemade. Also for anyone who has been to an older NYC apartment they know we do not all have dishwashers so the less dishes the better!

Chocolate Cake

Yields 12 Servings

Dry Ingredients: 1 Cup of Sugar, ¾ Cup of All Purpose Flour, 1/3 Cup of Unsweetened Cocoa Powder (This may be the one ingredient you do not have on hand but you should, it is versatile and perfect for last minute baking for a party or a spur of the moment project with friends or your kids), ¾ Teaspoon of Baking Powder and ¾ Teaspoon of Baking Soda

Wet Ingredients: 1 egg, ¼ cup of milk or your choice, I have used regular, lactaid and almond milk and they all work just fine, ¼ Cup of Vegetable Oil, 1 Teaspoon of Vanilla Extract (hint in the winter peppermint extract can also be added for a chocolate peppermint cake) and ½ Cup of Bowling Water

This cake will come to life in a few easy steps:

Preheat your oven to 350 degrees F, or your toaster oven which is where I do most of my baking. Start Boiling Water either on the stove or you can use an electric tea kettle, do not measure now just boil a good amount and you will measure when you are adding it. Using a medium sized mixing bowl add all of your dry ingredients and give them a quick whisk. 

Top: All your Dry Ingredients Mixed; Bottom: After Wet Ingredients have been added

Now add all of your wet ingredients including your now boiling water which you should use a measuring cup to add, be careful when pouring not to burn yourself and if you are making this with kids please use adult supervision. Whisk it all together! Use cooking spray on your cake, cupcake or loaf pans whichever your would like to use and then fill them ¾ of the way with your cake mix and put them in the preheated oven. Cook times will vary based on your oven and the pan you are using, I have found with cupcakes 15-20 minutes should suffice and for cakes 20-25 minutes based on size. When in doubt check every few minutes until you can put a toothpick in the middle and it comes out clean. Now COOL your cakes in the pan for a few minutes and then on a cooling rack or even a plate. 

Once your cake is cooled simply pop it our of the pan by gently turning it over, you can display it on a plate or I used a cute little pie pan for a cleaner look and to show off the caramel drizzle

Once your cake is cooled you can start your... 

Caramel Drizzle 

½ Cup of Butter (4 Tablespoons), 2 Cups of Sugar and ½ Cup of Heavy Cream

Using a non stick pan on medium to low heat melt your butter slowly and be sure to not burn it, and when it is almost done add your sugar 1 Cup at a time stirring in between. Continue stirring constantly to avoid burning and until the caramel is a nice golden brown, now slowly add the heavy cream while stirring. Once it has all been incorporated and has a nice glaze consistency drizzle over your cake for a delicious and beautiful topping. Then sit and enjoy and accept the many compliments that will come your way from anyone who gets a taste.

If you are a Frosting lover this caramel can be made into a Caramel Butter Cream with a few extra steps, which you will be able to find in the downloadable version of this recipe.

Download the Recipe

Post by Amalia Queller of Queller Crafts

Etsy, Instagram & Facebook

D.I.Y Project for a more sustainable life

UPCYCLED BATH CANISTERS 

Roll call for who here remembers the 3 R's !

-Reduce -Reuse -Recycle

We all know by now that Global Warming is a serious issue that should not be taken lightly & any opportunity we may have to reduce our global footprint we should take it. Today I will be sharing a quick & easy D.I.Y that will allow me to put those 3 R's in motion & here is how you can too . . . . 

The bathroom in my New York City apartment just underwent a transformation, re-model & if you know anything about NYC apartments & their bathrooms you may also know that space & storage can be limited. I needed a small storage solution for some bathroom toiletries but before heading over to the nearest Crate & Barrel for some bathroom canisters, I decided to make my own out of some old candle jars I had still sitting around from last autumn. 

 When shopping for candles I always look for packaging or containers that can be reused some way somehow. Candles can come in some really pretty & at times lavish containers so why wouldn't you want to reuse something so beautiful later down the…


When shopping for candles I always look for packaging or containers that can be reused some way somehow. Candles can come in some really pretty & at times lavish containers so why wouldn't you want to reuse something so beautiful later down the road.  A few tips for doing this is to look for containers with lids or easy to remove labels so that when it comes time to reuse & repurpose them it will be hard to distinguish what they might have been in their previous life. These two jars here ended up being just the size I was looking for all they need is a little love . . . .    

 First things First Remove all labels & stickers. 


First things First Remove all labels & stickers. 

 Once your candle has completely burned out scrape all remaining wax out of container & remove wick. I usually use a dull butter knife for this process & it gets the job done. 


Once your candle has completely burned out scrape all remaining wax out of container & remove wick. I usually use a dull butter knife for this process & it gets the job done. 

 Wash & Rinse your jars,  Dish detergent works great & for any stubborn spots or really sticky situations rubbing alcohol always does the trick. Once you have them clean your ready to go ! 


Wash & Rinse your jars,  Dish detergent works great & for any stubborn spots or really sticky situations rubbing alcohol always does the trick. Once you have them clean your ready to go ! 

 And there you have it The finished product !


And there you have it The finished product !

  As you can see I filled my jars with cotton balls & q-tips but the options here are endless. 


 As you can see I filled my jars with cotton balls & q-tips but the options here are endless. 

I hope you enjoyed this quick & simple D.I.Y and remember REDUCE, REUSE, RECYCLE

Until next time

X O X O

Rachel Leigh

www.MozieMo.Etsy.com

www.MozieMo.Com  

No-sew Upcycled Tee Shirt

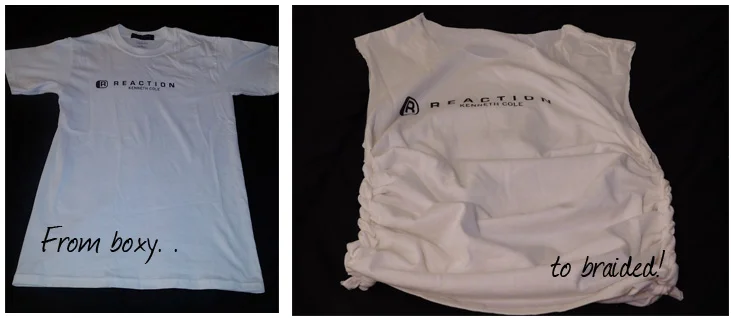
BoxyToBraided

Happy Earth Day All! To help you celebrate the holiday and being green throughout the year, I'm sharing a technique that lets you reuse old t-shirts that you can't seem to let go of, yet never wear. This also helps you reduce your material waste and upcycle instead of recycling without needle, thread, or a sewing machine! 

Before we start, grab one (or a few) t-shirt(s) from your drawer or closet  and get ready to breathe new life into your wardrobe. 

All you need for this project is:

  1. A tee shirt 
  2. A pair of sharp scissors
  3. More tee shirts, because you're going to want to do it again!

1. Start by laying your shirt flat, and cutting off the sleeves and collar. You can choose a V-neck, or cut the sleeves a little more if you like a skinnier tank-top strap.  

2. Next cut ten to fifteen horizontal two inch slits down each side of the shirt. Less cuts will give you a chunkier braid; more will result in a finer braid. I settled on eleven since this was not a very long tee.    

3. Now it's time to braid! Reach down into the loop created by your first cut.  

4. and pull the next loop up through the hole. If your loops are a little wide like mine, push the next loop up a little until you can grab it. 

5. Repeat with your remaining loops until you reach the bottom. You will see the braid start to take shape. If you aren't satisfied with the width, shake out your loops and cut more slits. Get creative! Make It your own!

6. When you reach the very bottom of your shirt, cut the last loop in half right at the seam. 

7. Pull the front tab of the last loop through your chain and tie it to the back tab. 

8. Done! Rock your flirty-cute, faux crochet-sided top! 

Post by Coleen Phoenixx

Etsy ° Instagram ° Facebook