Handstamping: A Tutorial

Hello there, New New Blog readers! I'm Kerry - a new contributor here. My Etsy shop is K. Batty Design & Stationery (or kbatty.etsy.com) & it's filled with personalized stationery, custom invitations, greeting cards & a few other paper products coming soon. Many of the items in my shop are hand stamped so I thought I'd kick off with that - a little tutorial on hand stamping with a simple one-stamp greeting card. Heeeeeeere we go...


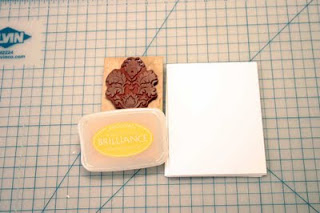
Supplies: a CLEAN rubber or polymer stamp, a CLEAN ink pad (not something your toddler has been playing with - you know how they are with the paints...), something to stamp on – for this tutorial, as I said, we’re hand-stamping a card, but you could easily personalize notepads, notebooks, gift tags, address labels…you get what I'm saying. You can purchase any of these things at your local craft or stationery store.


Step 1: Prepare your surface – any flat surface will do. Make sure it’s clean - let’s not get the jelly from your morning toast on your project. I like to stamp on my cutting mat..


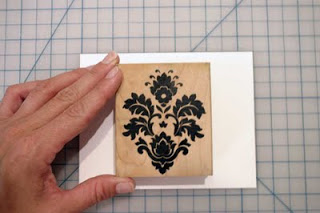
Step 2: Placement - Decide a head of time where you’re going to place your design. Line up your clean stamp on your paper until you get a design/placement that you like.


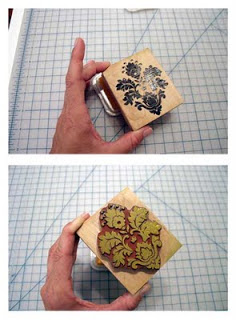
Step 3: Ink up! Lightly dab your stamp around the pad. Check your edges for over inking (places where the ink pools in your design or on the stamping block, like that spot on the right side of my stamp. Oops!).


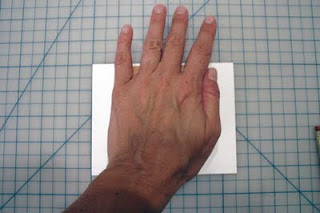
Step 4: Stamp! Use even pressure on the stamp, particularly in the center if it’s a large stamp like this one. Avoid “mashing” the stamp on the paper – the design will look fuzzy & bloated. Oh! This is why I like using my cutting mat. I use the grid to help line up my stamp on the paper.


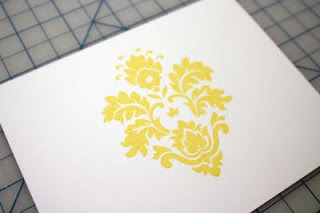
Step 5: Let it dry! As you stamp, carefully move your pieces aside to dry. Some colors will dry quickly; others take a while, particularly the metallic inks so be patient. Don't smudge it! Also, some surfaces/papers will absorb ink faster than others. Just leave your project on your work surface while you go on to the next step…


Step 6: Clean up! Cover your ink pads first to help keep them from drying out, ensuring a long life for your stamp pad. Wash your stamps & leave them to dry. Usually, I just wash my stamps with water, especially if I get to the sink as soon as I’ve stamped, but it depends on the ink you’re using. Some of it can be a little stubborn, especially if you have been stamping a lot of pieces.


Ta-da! You have a greeting card (or any other paper-product you can dream up)! All you need is an envelope, which can also be stamped if you want. It’s relatively easy & quick but takes some preparation & practice to do it consistently. If you’re a newbie, definitely practice your impression & alignment on a scrap piece before you move to your stamp surface.


Questions or comments? Leave them here & please do report back on what you create! Happy Stamping!

How to Make Egg Shakers

One of my favorite parts of parenting is inventing strange crafts out of random materials that engage my two kids for the longest amount of time for the least amount of money. The idea for this project came about from broken eggshells. I've been washing and saving eggshells for the last few months to crush and add to my garden as well as to compost. Then I realized that if you keep the two eggs halves they almost fit perfectly back together. Which made me think of the plastic egg shakers that are all the rage during preschool music classes and sing-a-longs. Which made me think what a brilliant idea someone had to make those plastic egg shakers. Which made me think that someone is making a lot of money off of that idea.

And you see how twisted and random my thoughts can be. Sometimes these thoughts turn to something productive, like developing a new hobby (gardening, recycling old clothes into new clothes, composting). Other times... well, let's just say sometimes my time can be better spent sleeping.

Back to the original point of this post, which began with me staring at half broken eggshells and feeling like they could be something more. I loved the way they fit back together after being broken, so I thought we could make real egg shakers minus the plastic. This turned out to be a multi-day process with the drying times factored it, but it was really sort of fun. So here's how to do it.

1. Clean your eggshells thoroughly and lay them out to dry.


2. Fill partially with different dried beans. We used lentils, split peas, and black beans.


3. Apply a thin layer of glue along the rim of the eggshell and fit the other side snugly on top, making sure it matches up perfectly.


4. Let dry for a few hours or overnight.


5. Cut thin strips of newspaper, about .5 inches by 2 inches, for the paper mache. Make a paste from flour and water (boil half a cup of water on the stove and whisk in a heaping tablespoon of flour - simmer lightly for a minute and then let cool). Dip paper in paste or use a paintbrush to apply the paste on the egg and cover the eggs with a few layers of newspaper and paper mache paste.


6. Let dry overnight. (Lay them on the egg cartons and make sure to rotate them so the entire egg dries.)


8. Use poster or acrylic paints to add color to your egg shakers.


9. Do a lesson on color mixing by only starting out with red, yellow, blue and white. Use the egg carton to mix colors (yellow + blue = green, red + blue = purple, red + white = pink, etc). 


10. Paint!


11. Let dry and then let the musicians loose on the shakers! I find the sound of beans on eggshells really soothing and much more pleasant than the plastic variety. Store the egg shakers in the dried out egg carton and also use in food play.


Sailor's Knot Bracelet Tutorial

Last year, the lovely Simone from Groundsel posted this great tutorial on sailor's knot bracelets. This Saturday, June 25th, Simone, Pria, and I will be doing demonstrations and helping visitors make their own bracelets at Governors Island. Please join us at House 6B in Nolan Park at Governors Island from 2pm-4pm. While you're there, be sure to take a look around the Better Than Jam Pop-Up Shop at Governors Island, filled with the best handmade goodies by local artisans. See you there!

Supplies you’ll need:
  • 3.5 yards of twine
  • 14 ounce can for a smaller bracelet or a 20 ounce can for a larger bracelet. Any other round object that has the appropriate circumference for your wrist will do.
Directions:
1. Wrap one end of the twine around the can to shape an X. Leave about a 4" tail. You will need this tail at the end to finish the bracelet.
2. Wrap the long end of the twine around the can again and bring it up to the middle of the X. Then pass the long end of the twine under the right, upper leg of the X and pull the long end all the way through.

3. Next, move the upper left leg of the X over the right leg of the X to create an oval shape.

4. Pull the long end of the twine through the oval shaped opening you just set up.

5. Turn the can a bit and you will see that the oval shape has created another X shape. Again, pass the long end of the twine under the right upper leg of the X and pull the end through.
6. Repeat steps 3 through 5 until you get to the beginning of your project.
7. You will now find a three-stranded braid. Follow the twine you initially laid out and create a parallel second line. 
8. Continue around the can. If you find that it's getting too tight to pass the twine through the openings, you may want to take the bracelet off the can and continue with the knotting in your hand. If you take it off, be careful not to pull the twine too tight, otherwise your bracelet will shrink on your wrist. 
9. Continue knotting the rope around the bracelet until each strand of the braid has one parallel line — a total of three passes. At this point you can stop or add another three passes to create the traditional pattern of three parallel lines, like the bracelet in the third picture in this step.
10. To finish, just knot the ends together and weave them into the inside of the bracelet.

Karina

Gelatin Plastic


I first encountered homemade "gelatin plastic" several years ago when I was looking for relatively easy and definitively inexpensive ways of creating art/craft materials for making gifts. Cash and time were extremely tight so shopping for and buying "real" materials (e.g., air-dry clay) was pretty much out of the question. I was limited to what I could concoct from everyday grocery, hardware-store and office-supply items like Elmer's glue, cornstarch, and in this case, gelatin and food coloring. So I found various recipes and how-to's online and adapted them to suit my particular purposes---most of the projects I found were of the "fun rainy-day activities for kids" variety so it was a matter of maximizing the capabilities of the material to make something that an adult could give another adult without anyone being horribly embarrassed. The following modified how-to for gelatin plastic makes for relatively flat, smooth-edged translucent shapes that you can combine into (or use singly as) cheerful sun-catchers.


Materials
  • Three envelopes powdered gelatin
  • 9 tablespoons water
  • Several drops food coloring
  • X-acto knife
  • Flat-bottomed dish (glass is best)
  • Shape templates (optional; not pictured)

Steps
Place the water in a saucepan and sprinkle the gelatin on top. Add food coloring and heat on low flame, stirring pretty much constantly until the gelatin is dissolved. Pour the mixture into a flat-bottomed dish and let set---most recipes say for 45 minutes to an hour, but I prefer at least a few hours. The longer set-time makes for less curling as your cut pieces dry.


Once set, cut the gelatin sheet into various shapes and sizes using cardstock templates (if you like) and an X-acto or similar knife---not scissors, as some recipes suggest. Scissors make for a less even edge. Ditto cookie-cutters. The difference becomes obvious once the pieces dry.


I like to leave my cut shapes in the original dish to dry, rather than remove them as most recipes/how-to's instuct. The original adhesion between the gelatin and the surface of the dish seems to help keep the pieces from curling overly much when they're drying. I also like to lightly tape down the edges of my cut pieces to help keep them flat as they dry. I haven't had any luck with the multiple plastic container lids and paper-towel/cheesecloth contraptions that many recipes/tutorials recommend for this purpose. Gelatin is much stronger-willed than that!


Allow your cut pieces to dry for 2-3 days (or more, depending on their thickness), then drill holes for hanging. Most recipes say to make holes for hanging when the pieces are wet, but I think you get a better result if you wait until they're dry. It's hard to predict how large the hole is going to be once the gelatin dries, and the edges can also come out raggedy. Raggedy edges will not do! Embarrassment will ensue!


Hang the pieces on a suction-cup hook and stick on a window. Use fishing line for a "floating-in-air" effect. Wait for the sun to shine through them; be surprised and intensely gratified at how pretty they are!


Until next time --


Linda

Tutorial: Recycle those grocery bags into terrific envelopes

Today’s post is tutorial on making recycled envelopes from guest {NewNew} blogger Sara Stroman of S2 Stationery and Design.   Thanks for helping us celebrate National Craft Month Sara!

I’m Sara Stroman from S2 Stationery and Design and as promised I’m sharing a video (gasp!) showing how to take those brown bags you get when you shop at Trader Joe's, Whole Foods, or anywhere else they may pass them out, and turn them into envelopes you can use to send your personal letters, notes and maybe even small invitations.   
It really is easy to give a new life to those bags, so save them until you can sit down for an hour or two and create some envelopes.  Not to mention, you’ll feel really proud of yourself for taking the time not just to recycle, but to send your loved ones a handmade object.

The video is 9 minutes long, I hope you find it easy to follow.  I go over envelopes sized known as A2, or 4 3/8’ by 5 3/4’.  Remember that those are only the width and height of where the card will sit in the center of the envelope. The other dimensions are: 2 ¼ for all three flaps and 3 ¾ from the top of the rectangle to the tip of the flap. A copy of the pattern is available for you to print out, to show how to create the actual pattern using a ruler. I just gave you the dimensions on the video and showed you how I opened an already existing envelope to help create the pattern I use.


Having trouble? Click here to view on YouTube


These envelopes really take minutes to make once you get used to the shape. Just remember the supplies you need are scissors, glue and a ruler. A bone folder is optional (but good to have should you decide to make envelopes out of heavier weights).

And that’s it! If you have any questions, or want to share some of your envelope making stories/designs with me, feel free post your comments on the blog or convo me on Etsy www.saraes26.etsy.com.
Oh and somewhere toward the end, I mentioned decorating the interior of the envelopes. Maybe The {NewNew} blog will host another video session with me showing how to create linings for your handmade, recycled envelopes.  
Until then, happy recycling and envelope making!
Sara / S2 Stationery and Design


Thanks for sharing Sara.  
We will most definitely want you to share that next tutorial -- Holly / EllisDesign

Tutorial A Relaxing Bath Soak Ahhhh

Let's face it, we all have way too much stress in our lives.  Here is a relaxing bath soak, that's easy to make from our friend Megan over at Metropolis Soap.

You need:
Epsom Salt(8 oz should do)


Dried rose petals (You can use fresh but I recommend drying the petals first if you plan to store this soak. Also make sure the rose petals are free from pesticides!)


Lavender Essential Oil (If you don't have any, you can pick it up at natural food stores like Whole Foods in the Whole Body section)


Vanilla Extract (Vanillin works,too)


You'll also need: A Mason Jar and Ziploc Freezer Bag
Optional: Muslin Bag, 1/4 c. scoop

Step 1: Collect the Ingredients
Step 2: Mix Epsom salt with rose petals and oils in the freezer bag
The amount of scent you want is up to you, I recommend about 5 drops of each as a middle-of-the-road strength of scent.
Step 3: Shake shake shake!
Shake together the mixture and make sure the oils have thoroughly coated the salts. A little goes a long way!
Step 4: Pour into mason jar
Mason jars are good to use because the essential oils won't break down the glass like they might do with plastic jars, and they're durable so that if you accidentally drop it in the bathroom it won't break.

To use: Drop approx 1/4 c. of bath soak into tub while water is still running and enjoy! If you don't feel like cleaning up the rose petals after the bath, scoop mixture into a muslin bag and drop the bag in the water.

Mix it up! You can also use peppermint essential oil (extract should work) and create a soothing foot soak instead!

And if make it yourself is not your bag - just search The {NewNew} for plenty of relaxing items from PureSpa2 and NordeaSoaperie.

Enjoy!
Lorrie / Lenny Mud