How-To IKEA Hack: Circular Bulletin Boards

Sometimes you need a quick and easy handmade gift (or to restyle your own desk or studio space), so here is a simple IKEA hack that takes less than an hour and under $5.

Trivet to Bulletin Board


You will need:
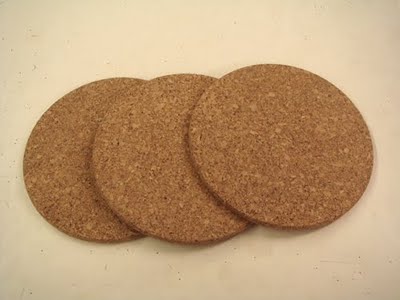
IKEA's "Heat" Trivets ($2.99 for the set)
Attractive flat thumbtacks
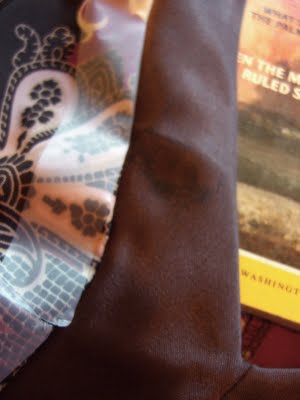
Scrap fabric larger than the trivets
Glue (I used Magna-Tac, but Tacky glue or hot glue would be good choices)
A drill with large drill bit

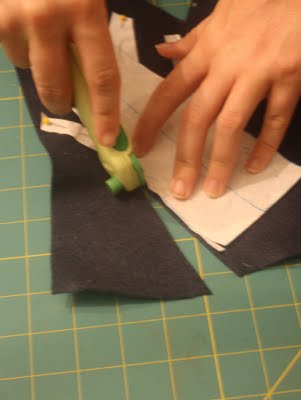
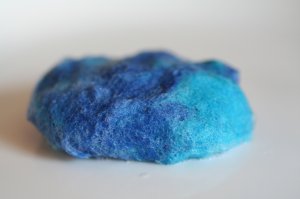
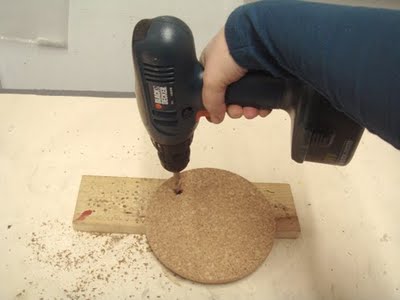
First, drill a large hole in each piece of cork about 1" from the edge. These holes need to be large enough for hanging your finished board by either a nail or a push pin.

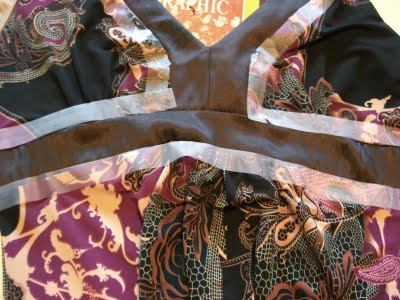
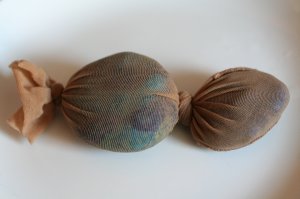
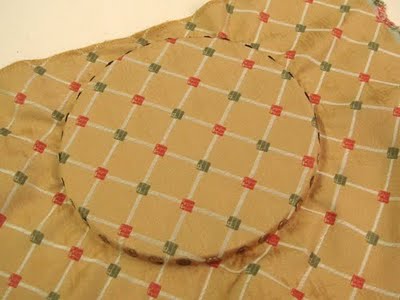
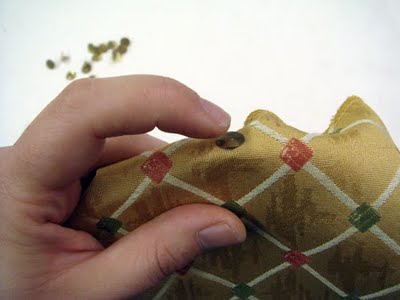
Next, push your thumbtacks through the fabric along the narrow edge of the cork. Pull the fabric as you go to make a taut and smooth surface on the face of the bulletin board. You will get the best results if you add the tacks evenly with each tack opposite to the one you put before (see example starting order below).
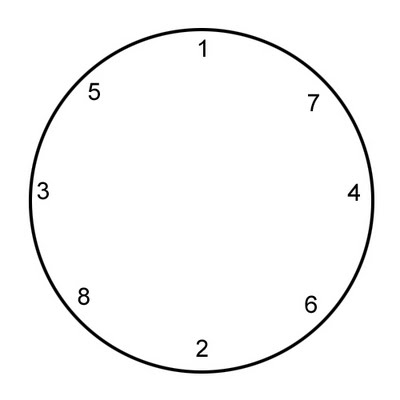
Fill in this pattern until your edge is completely covered with thumbtacks.

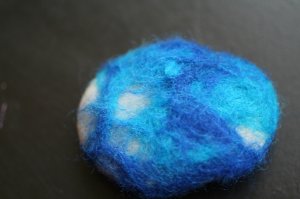
At this point, your bulletin boards should look like this.

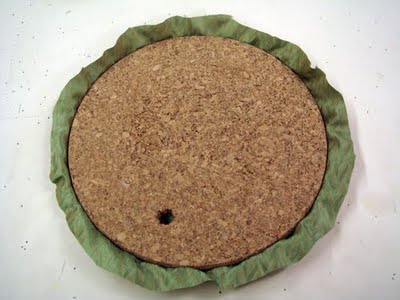
Flip over your bulletin board, and trim excess fabric to about 1" all the way around.
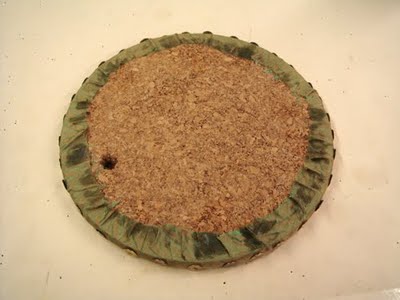
Glue down the excess fabric around the back. Allow to dry.
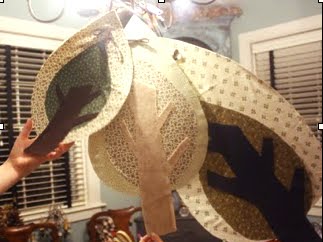
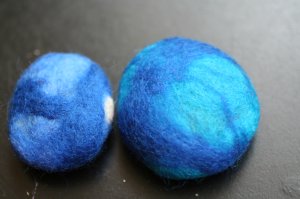
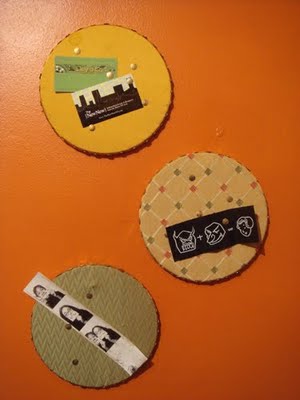
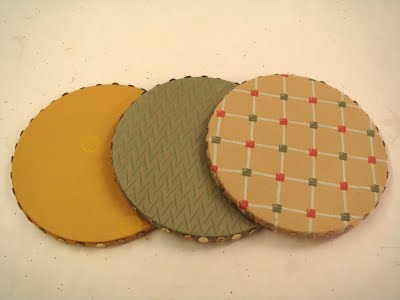
You're finished! Here are the three coordinating bulletin boards I made for this tutorial.
Hope you enjoy making this quick project, and please link to photos of your finished bulletin boards or comment to share variations that you come up with.

~Kari
http://ikyoto.etsy.com

Bring the Fun of the Fall Cavalcade Home

It’s Sunday and you’ve enjoyed a beautiful day in Beacon, New York snatching up handmade wares from the {NewNew}. The feeling was so good, you want it to last forever. What to do? Make yourself some decorative {NewNew} Fall Handmade Cavalcade trees to enjoy all year long. These would make great wall decorations and can easily be hung anywhere. The steps in this project can also be applied to lots of other shapes - such as pumpkins for Halloween or turkeys for Thanksgiving. Maybe even tiny ones to hang on the Christmas tree?

For this project you need:
Card Stock
Newsprint paper or even an old copy of the NY Times Double-sided tape
Fabric Glue
Scissors/ Rotary blade
Cutting Mat
Colorful Quilting Fabric
Felt to compliment the fabric
Ribbon (we used 1/4" grosgrain)
Awl
Pins
Pencil
Ruler
Cookies and Milk (optional)

Create Your Pattern We made three sizes trees that were 28 inches, 22 inches and 16 inches tall. You can make whatever size suits your needs just keep in mind the final project will be hanging off a ribbon and will add a few inches in length. To make a pattern for the base tree start with the card stock. Take your ruler and measure out the length of your tree and mark the line with a pencil. This is the center axis of your tree. On either the left or right side of this line, draw a 1/2 tree. Cut this shape out. Now trace this shape on another piece of card stock. Flip the 1/2 tree pattern over, align the center axis with the shape you have traced, and trace the other half of the tree. This makes sure that your shape is symmetrical left and right. Once your symmetrical whole tree shape has been cut out, set it aside as this is the base.
Now roll out a section of newsprint paper. Trace your 1/2 tree shape onto the newsprint. Then inside that shape, draw a 1/2 arc that starts and ends along the center axis. It is helpful to do this within a tracing of your base tree so that you don't have to guess size and proportion. Now fold the newsprint along the center axis and cut out your center shape along the line you drew.
One pattern left, the felt trunk pattern. On newsprint again, take your 1/2 tree cardstock and trace just the bottom truck. Flip it over along the center axis to trace the other 1/2 of the trunk. Using a ruler, extend these lines up so that the length is about half of the total height of your tree. Extend branches from this trunk. Cut out your trunk shape and now all the patterns are complete! Take a moment for a pattern happy dance.
Fabric Time! Take the whole tree cardstock base that you cut out and apply double sided tape all along the edges. Stick this to the backside of one of your printed quilting fabrics. Using the edge of the cardstock as a guide, cut out the fabric so that it is the same size as your base.

Select a second printed quilting fabric, pin the paper pattern to it, and cut the shape out. Repeat this step to create your felty awesome tree trunk. Make sure your fabric is ironed and wrinkle free before you cut. Wrinkles ruin trees (or maybe you would call it character.) With your fabric glue (we prefer Beacon Magna-Tac 809 permanent adhesive), glue down the printed center of the tree to your printed base. Try to make sure you get the top points aligned and centered. Then glue your felt tree trunk on top.
Let it all dry for about 30 minutes while you admire your work and enjoy yummy cookies and milk. (Optional but recommended)

Alexandra and Virginia enjoy a not to vintage 2% and amazing chocolate chip cookie.
Finishing Touches Once your magical Fall Cavalcade tree is dry, carefully use your awl to poke a hole through and through about 3 inches from the top of your tree. From the good side of the tree, center your length ribbon on the whole and push it through. We used dull tweezers to push through as much as possible, and then pulled from the underside with a needle. You now have a loop coming out the back and two loose ends coming through the front. Tie these loose ends into a pretty bow.

Conceived by Jody and Alexandra Ferguson

With lots of help from Lauren, Virginia and Kelly

Reported by Kelly

Clean Up That Mess - Of a Dress!

Back in April, Karin of better than jam taught us how to screen print over a stain to bring a shirt back to life.

I am not a screen printer, but I am a spiller, and so when my favorite traveling dress developed an unsightly stain, I was eager to try a less technically savvy version of Karin's cool trick.

I have an India ink stamp pad and a collection of cool stamps that I use to personalize the reusable bags I package my jewelry in. You can find a similar one here. It's important not to use a regular run of the mill stamp pad, because the ink will not set and your clothing will be even more ruined than it already was.

Here's the offending stain pre-stamping: (It's not so visible in the picture, but believe me it was noticeable.)


Step 1: Test your stamp on a section of the fabric that is not visible when you wear the garment.

Step 2: Tape around the edges to protect the fabric you don't want to stamp. Slip a magazine inside the garment to give you a smooth stamping surface and to prevent the ink from bleeding through to the back of the fabric.


Step 3: Start stamping! I chose a stamp larger than my target stamping area because I wanted the image of the leaf to be abstract. I alternated the leaf position by rotating the stamp with each use. I tried to keep the images evenly spaced, but I just eyeballed it.


Step 4: Heat set: I blasted the stamped area with a hairdryer for a few minutes.

And that's it!


-MaryAnne LoVerme
wabisabibrooklyn.etsy.com
wabisabibrooklyn.com

Felted Memories


Every time we come home from the beach, we return with at least a handful of rocks scavenged from the sea. I recently saw some felted rocks at a museum store and decided to try this technique to decorate our rocks instead of painting them. My research led me to two blogs that discussed the manufacturing process in some detail:

Julie of Crafting A Green World explains her process, in which she felts a rock by hand. Margaret of resurrection fern had enough of handwashing and decided to use her washing machine to do the job. I tried both methods and these are my findings:


Materials


For this project you need
  • Rocks, mine were about 1.5 to 2 inches in diameter
  • Wool roving, you can find it on Etsy
  • Dish soap
  • Pantyhose, if you want to try the machine method


  • Take a bit of wool roving and wrap it around your rock. I didn't want to fully cover my rocks so my layer is somewhat thin.


    Using the dish soap and hot water, soap up your rock. If you decide to follow Julie's hand felting method, continue to wash the rock, move it around, squeeze out a bit of soap, and continue to rub it until it is felted to your liking. If you are hand felting, squeeze out as much of the soap as you can making sure that the rock is covered with the felt and let it dry.


    If you want to felt your rock in the machine, cut off a pantyhose leg, and begin to fill it with your soapy rocks tying off each rock separately so they don't felt against one another.

    I live in an apartment building that just got new machines. Because I didn't want to incur my neighbors' wrath, I limited myself to two rocks, tied those into my pajama pants, and washed everything together with a heavy blanket on hot. Margaret is much more courageous. She made a string of 19-plus rocks. Whether you follow her example depends on your living situation.


    So here is the outcome. This is the hand felted rock. Not as smooth and somewhat fuzzy.


    These are the machine washed rocks. They are very smooth and quite perfect looking. All of them are beautiful, I think. It just depends what your personal preference is.

    Just one thing, if your super gets upset when you felt your vacation souvenirs in the machine, don't refer him or her to this blog.

    Thanks

    Simone
    groundsel.etsy.com

    How-To Find Foreign Thrift Stores & Flea Markets

    When I started planning my first trip to Italy this spring, the Wardrobe Refashion Challenge seemed like an excellent excuse to seek out ways to buy used and handmade garments as souvenirs. Thrift stores and flea markets are some of my favorite places to shop at home, and at first, finding these options abroad was proving challenging. I like to shop in smaller cities with an eye for bargains and an element of the hunt, but many of the shops whose information was available in English or had been blogged by foreign tourists seemed a little pricier and in major cities. Our trip was through Venice, Bologna and Ravenna. Since Venice is both expensive and very touristy, and Ravenna was only a one day stop, we decided that Bologna, a famous college city, would be the place to shop. I had trouble finding anything there to suit my taste until I discovered a few foreign language search tricks.

    Here are two ways I used to find places to shop using Google Translate.

    1. Translated Search - Easier for people who don't like language puzzles. Very simple and straightforward, but I found that the end results were a little less good. Just use the search terms you might normally use (e.g. flea market Bologna) to search the web, but choosing the English -> Italian options. Keep in mind that you might need to try several variations of word combos, since what is a "recycle shop" in one language might be a "thrift store," "ops shop" or "used clothing market" in another.


    La Piazzola
    This open air market was found using the first method. Every Friday and Saturday there is a huge market that has sections devoted to both new and used items. There were housewares as well as clothing and accessories, but one big surprise was the number of counter-culture type booths.

    I purchased a fabulous handmade vintage dress with sailboats for only 10 Euros. My partner who is not doing WR Challenge got a new Italian belt and underwear.


    2. Hybrid Search - In this method I translated many different phrases for what I was looking for into Italian, and put them into a regular Google Search.


    By scanning the search results in Italian for repeated phrases, I picked out new search terms that were more natural in Italian such as "usato e vintage," "negozio dell'usato," & "mercantino dell'usato." I looked at the translated versions of these sites to see what I had found. Repeat the process until you find the best search terms. While doing this, keep in mind that if the search page prompts, "Did you mean...?" and gives an alternate phrase, the answer is probably yes.

    Mercatopoli
    Since this one was part of a chain, it seemed like a jackpot choice. There were 4 just in Bologna, and if we ever went to Italy again they seem to be everywhere. The selection was like a lower end thrift shop in the U.S., but I did see some amazing things such as the handmade vintage dress that I purchased for 6 Euros.


    Cose d'Altre Case
    Our biggest haul was from here! They had a great selection of very nice housewares, clothing, jewelry, books, etc. They also had framed and unframed prints that would make excellent souvenirs. We picked up a hand-blown carafe, an enamelware pot, a men's shirt and a women's shirt for just 20 Euros.


    We had a great time shopping in Italy, and will probably continue our thrift store adventures on future trips. So if you have any suggestions for the best search terms in other foreign locations, please add them to the comments!

    ~Kari
    http://ikyoto.etsy.com

    Postcards From The Road

    Are you on vacation? Is it time for you to remind your hardworking friends at home that you are thinking of them? Can't find a postcard that truly describes the beauty of the place you're visiting? Just make your own.

    All you need are scissors, some sort of card stock (a cereal box will do) and whatever art supplies you can hunt down at your vacation abode. I tend to travel with a backpack full to entertain the kids in the traveling party, but I'm sure you can come up with a creative piece even if you just have a ball point pen.

    Crayon and a Paper Bag


    Look at the interesting paper you get when you purchase something from the local merchants. Hmm, cut it into a skyline and glue it onto a crayon sunset.

    Leaf Prints

    Okay, so you may not travel with water colors, but just in case you do, turn a special leaf you found on a leisurely walk into a leaf print. Apply paint to the ribbed side of the leaf and use a bottle (sunscreen in this case) as a rolling pin to print a design.

    Drawing

    Our trip was dominated by the purchase of these hamster erasers. Here is a marker portrait.

    Ransom Note


    Kidnappers must have a lot of time on their hands because it took longer than I thought (30 minutes) to cut out these letters from travel brochures we picked up.

    The standard postcard size is 3.4" to 4.25" high and 5" to 6" long. Don't have a ruler to measure your card? Use a promotional card from a coffee shop as a template.

    Happy Travels

    Simone
    groundsel.etsy.com