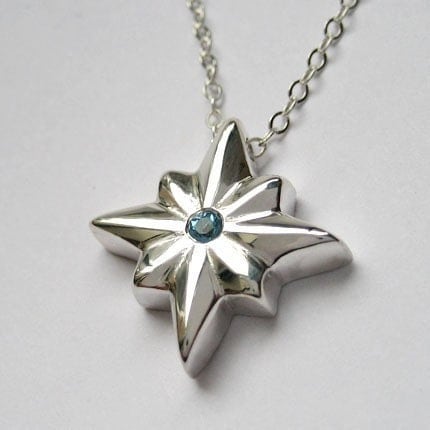
Wax Carving Jewelry
Here's a little peek into my life of an Etsy crafter in NYC.
Wax carving. It's something I never thought I could do, yet it's one of the fundamental ways you can create a fluid-looking-3-dimensional piece of jewelry. I was never any good at working with clay or even carving Ivory soap bars on Girl Scout camping trips in 5th grade. Even now I am surprised when I'm finished carving a piece and that it actually turns out looking like what I intended it to. I should have gotten over that by now, but that's another story for another blog.
Here's a piece that I carved in March. It took me about 3 1/2 hours to carve it, but I had to take little breaks in between. Usually when I start swearing I know it's time to walk away from my bench.
Step one, start with a block of wax:
Step two, saw off a slab and trace pattern onto the block:

Step three, saw out a rough shape:

Step four, shape with files, fingernail, rough cloth, whatever ya got:

Step five, using burrs carve out the back of the piece and create a bail so the chain can fit:

Last step, smooth it out until it's perfect and ready for casting:

And the final piece:
Ta-da! That's how I make most of the work in my little corner of my little room in one of the biggest cities in the world.
Stephanie Maslow-Blackman
metalicious
Wax carving. It's something I never thought I could do, yet it's one of the fundamental ways you can create a fluid-looking-3-dimensional piece of jewelry. I was never any good at working with clay or even carving Ivory soap bars on Girl Scout camping trips in 5th grade. Even now I am surprised when I'm finished carving a piece and that it actually turns out looking like what I intended it to. I should have gotten over that by now, but that's another story for another blog.
Here's a piece that I carved in March. It took me about 3 1/2 hours to carve it, but I had to take little breaks in between. Usually when I start swearing I know it's time to walk away from my bench.
Step one, start with a block of wax:

Step two, saw off a slab and trace pattern onto the block:

Step three, saw out a rough shape:

Step four, shape with files, fingernail, rough cloth, whatever ya got:

Step five, using burrs carve out the back of the piece and create a bail so the chain can fit:

Last step, smooth it out until it's perfect and ready for casting:

And the final piece:
Ta-da! That's how I make most of the work in my little corner of my little room in one of the biggest cities in the world.
Stephanie Maslow-Blackman
metalicious


