Tutorial: Making a simple Cafe Curtain

 This is an easy project for anyone with basic sewing skills. Also it's a great way to add a little change to your room.

What is a cafe curtain?  Basically it is a panel and it is super easy!  It can be a full panel covering the total window or a half panel, covering the lower half of the window. Just imagine a cafe in Paris and sitting at a table you can peer over the curtain to watch outside or put your head down and read a book without everyone watching you.  A single panel is good for small windows. You can push it open by sliding it slightly or using a complementary tieback.

We have a door in our bedroom that goes out to the back yard. The door has a small window so we didn't want anything fancy for covering it up. We also wanted it to match the shade we got for our windows, a warm latte color.  A cafe curtain was the perfect solution.

Materials:

1. Enough fabric for the window length and width, see how to add allowance below.

2. Type of fabric: I prefer quilting weight fabrics, 100% cotton

3. Needle size: 9 or 11

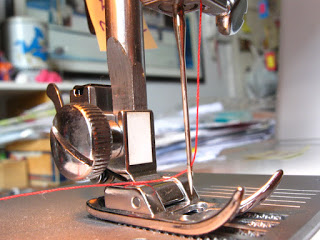
4. Thread: cotton or cotton poly

Instructions:

1. Measure your window and add 2" to the height and width

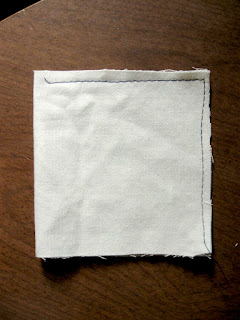
2.  Fold over 3/8" seam allowance on all 4 sides, steam.

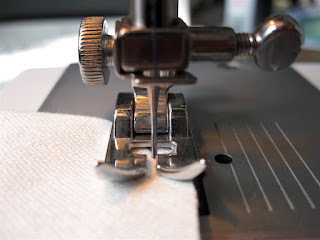
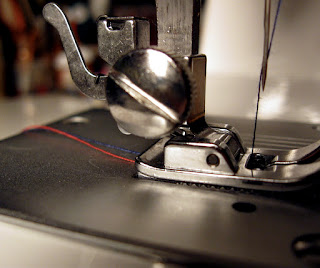
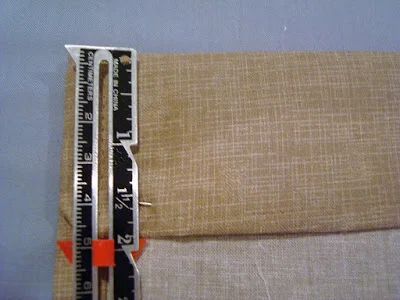
the tool in this picture is called a sewing gauge, they are great for measuring seam allowances

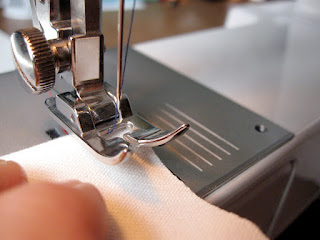
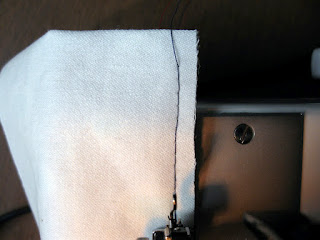
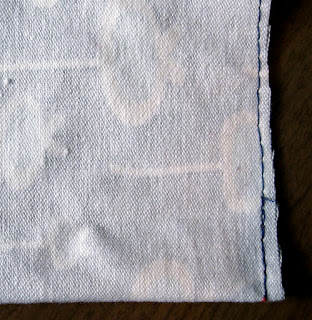
3. On the bottom and sides fold in another 3/8", steam and sew an edge stitch on the inside fold.

4. Be sure to steam after sewing!

5. For the top loop I over locked my raw edge since I have a serger. But don't worry, if you don't have a serger just fold over once and steam as in step 2.

At the corners fold in a diagonal then pin down and steam. Normally I don't put pins like this, but the seam allowance is so tiny I do in this case.

6.  Fold over 2", pin and steam

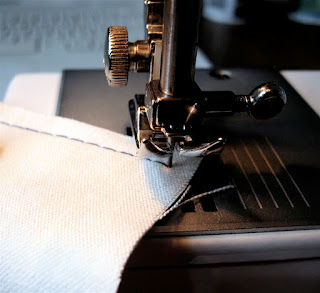
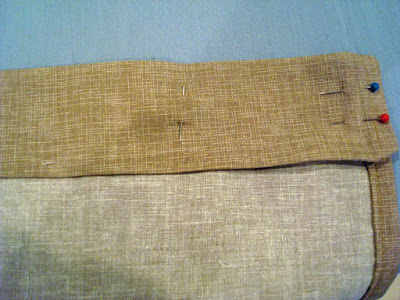
7. I find it helpful to pin the end openings so they don't shift when you are sewing the edge stitch on the fold. See below.

8. Finished! And iron with steam! And hang!

the fabric I used is 100% cotton called Quilter's Linen, it has a linen look, purchased at Purl Soho. Since this is a door with no window frame, my husband found curtain rods that are magnetic at Home Depot! I believe Target also carries them.

Enjoy!

Tracey Toole

http://www.etsy.com/shop/traceytoole

Egghead Learns to Sew, Part V

Hooray! Today it all comes together and I sew a couple of pieces of fabric together!

I gleaned from the Instruction Manual how to do this based on its coverage of the topic  "Changing Sewing Directions," rather than by following specific steps because this was the topic that immediately followed "Drawing Up the Bobbin Thread."
Doing so turns out to have been a good thing, as the section that I would have expected to follow "Drawing Up the Bobbin Thread," namely, "To Start Sewing," which I eventually found a few sections  later, was inadequate and even nonsensical: When I later followed those instructions, the thread got all tangly and/or the machine simply did not respond. I found Step 2. to be particularly confounding.


In any case, I hope that the steps to start sewing that I gleaned from the "Changing Sewing Directions" aren't bad for the machine or otherwise ill-advised. (Please do tell me if they are!)

To Start Sewing


This is obvious, but since I haven't used them in awhile, it might be worth noting that before starting to sew I attached the foot control the sewing machine and then plugged it into a power source.


After threading the upper thread, drawing up the bobbin thread and pulling both threads toward the back of the machine, I positioned the fabric that I wanted to sew under the needle, which was raised to its highest position.


Turning the hand wheel clutch slowly toward me, I lowered the needle into the fabric. Then I lowered the presser foot.


I pressed down on the foot control and woohoo! I was sewing!


When I got nearly to the edge of the fabric I stopped. With the needle in the fabric, I lifted the presser foot and pivoted the fabric around the needle to sew down the next side of the fabric.


I had the idea that I'd make a pincushion or tiny pillow of some sort as my first sewing project so I left the last side of the fabric open (the remaining side of the fabric was folded over). Thus, when I got to the edge of the second side of the fabric I was sewing, I stopped and followed the directions in the Instruction Manual for finishing a seam.


Specifically, pushing down on the reverse lever, I sewed backwards for about two inches. Then, turning the hand wheel clutch slowly toward me, I raised the needle to its highest position, lifted the presser foot, and pulled the fabric out toward the rear of the machine. As instructed, I cut the threads using the thread cutter on the back of what I think is the needle bar, but this was awkward so next time I'll just use scissors.


Next, I have to learn about different kinds of fabric and thread, and corresponding settings on my machine.

Until then --


Linda
Purty Bird

Egghead Learns to Sew, Part 4

Today is a big day! I get to the very cusp of sewing by adding the bobbin thread to the upper thread that I threaded last time. According to the Instruction Manual, this entails four steps: removing the bobbin case and bobbin from the compartment below the needle plate, inserting the bobbin into the bobbin case, inserting the bobbin case into the shuttle race, and drawing up the bobbin thread. Whoooeeee!
The first three steps really comprise one big operation, so I cover them together, followed by the fourth step.

Removing the Bobbin Case and Bobbin, Inserting the Bobbin into the Bobbin Case, and Inserting the Bobbin Case into the Shuttle Race


One thing to note: the Instruction Manual sometimes calls the sewing machine parts relevant to a given operation by names other than the one it originally used to identify them. For instance, regarding the set of operations I'm covering here, the originally identified "bobbin door" is called the "shuttle race cover." I'm going to keep to the original names for clarity's sake but note where the Instruction Manual diverges, just so you're aware of the alternatives.


As mentioned earlier, the action in this operation occurs in the compartment below the needle plate, behind the bobbin door. It's where the bobbin lives, in a case, inside a part of the machine called the shuttle race.

The first step of the present operation is to remove the bobbin case from the shuttle race.  (Before you start make sure the needle is at its highest position.) Open the bobbin door. Find the little latch on the front of the bobbin case and pull it to release the bobbin case from the shuttle race.

Next, insert the bobbin into the bobbin case, leaving a tail of thread about about 3-3.5 inches long outside it.

Pull the end of the thread through the little notch on the inside rim of the bobbin case and  out an oval-ish opening on the side of the bobbin case, called the tension spring.

Holding the bobbin and bobbin case together, pull the latch on the front of the bobbin case again and set the bobbin case inside the shuttle race. A handy tip: The bobbin case and shuttle race are like pieces of a puzzle; they have corresponding, inverse parts. Specifically, the bobbin case has an arm attached to the front of it that fits into a notch at the top of the shuttle race. Line up the arm and the notch and place the bobbin case onto the center pin of the shuttle race. Release the latch. The completed puzzle looks like this:

You're done! Close the bobbin door!

Drawing Up the Bobbin Thread

(This step requires that you've already threaded the upper thread. Please see my previous post for instructions if you haven't. Thanks!)


It's all starting to come together! Hold the upper thread (here, in dark blue) to the left side of the needle loosely with your left hand. Turn the hand wheel slowly toward you until the needles goes down and comes up. The bobbin thread (here, in red) will be brought up looped around the upper thread.

Pull the bobbin thread out with your fingers and together with the upper thread, under the presser foot to the rear of the machine.

Add electricity and fabric, and.... Stay tuned!

Until next time --


Linda
Purty Bird

Tutorial: How to sew a button

This past week I had a customer who was desperate to have a button sewn back onto her beautiful french cashmere sweater. She was mega desperate.  She had taken the sweater to 2 cleaners/tailors and they did a hack job on it. The woman was leaving for LA the following day and desperately wanted to take her new sweater with her. Did I mention she was desperate? The button was a beautiful, decorative, slightly chunky rhinestone shank button. Lesson 1: There are two types of buttons, the regular button with holes in it and then a shank button like the kind on a pair of jeans.  
 I was hesitant to take the job because she wanted to wait while I fixed it on my lunch break. The sweater being cashmere was very delicate and already numerous holes were poked thru. 

I teach sewing at a few places in the city and I find that many people just want to learn how to sew a button on and hem a pair of pants. So I thought I would share the knowledge and give you a tutorial on sewing a button.


1. If you are in a crunch use any kind of cotton or poly thread. But if you have the time you should buy proper quality thread. I like Gueterman brand.  Other quality brands are Coats and Clark and Mettler.  The rhinestone button that I sewed on for this customer was being sewn onto a cashmere sweater, very fragile fibers, so I used a wool/nylon strictly utilitarian thread from Sajou called Laine St Pierre found at Purl Soho.


Step 1 - Double strand your needle. Cut the thread to be no more than 18". Knot the end. Start the threading from underneath the button thru the fabric. 


Step 2 - Insert thread into a hole next to it, not diagnonal. Then slip another needle or a toothpick under the thread to form some extra space between the thread and button. You don't want the thread to be super tight next to the button because this can cause it to break.


Step 3- Stitch thru the other holes three or four times.

Step 4 - FInishing off - wrap the thread under the button and around the stitches you just formed. You are building a little shank that the button sits on. Remove the toothpick.


Step 5 -  Wrap around about three times. Now it's time to make a knot twice or back stitch. Back stitch on hand stitching is going thru the same stitch a few times, then make a knot in your thread. 

All done! Never pay someone to sew a button on for you again! 

Please feel free to post any questions.

Thanks and Happy Monday!

Tracey


Egghead Learns to Sew, Part III

Today I thread the needle (or "upper thread," in the parlance of the Instruction Manual) of my fabulous Christmas-gift sewing machine, inching ever closer to efficiently and effectively stitching fabric and making all kinds of wonderful textile-artistic things! Yay!
Excitement is beginning to overtake the nervousness I initially felt at this prospect.


The Parts

Threading the upper thread involves a few previously labeled parts of the machine, namely, the spool pin, bobbin-winder/thread guide, thread tension knob (although indirectly), and the thread take-up lever; plus a few unnamed parts. One of the unnamed parts is located behind the the face plate cover. The others are attached to the named parts, which may explain why they're not specifically named. In any case, the Instruction Manual provides a diagram (pictured above) of the path the thread is supposed to travel through these parts on its way to the needle. While it's reasonably easy to follow, it would benefit from color photos and a bit of narrative. This is where the the current post comes in.

The Steps

Obviously, the first step is to place thread on the spool pin. (This is Step A on the diagram, in case you're following that as well.) Now you're on your way. The thread's first touch-point is the bobbin-winder tension knob and thread guide. Pass the thread under the bobbin-winder aspect of this part of the machine (the circular bit in top) and through the little horizontal hook part just below and in front of it (Step B on the diagram).

Pull the thread down to the thread tension dial. Just behind the dial itself are a couple of circular plates. The space between the plates is where the thread passes through. Attached to the tension knob/twin plates is a delicate little hooky-loopy thing. Pass the thread in-between the plates and through the delicate hooky-loop (Step C on the diagram).

Now, pull the thread up and through another hook located just above and to the left of the thread tension dial/twin plates (Step E).

Keep pulling up. Pass the thread through the thread take-up lever (Step F). It's probably easiest to do this if the lever is in its upper-most position. To get it there, turn the hand wheel clutch (the larger of the two wheels on the right side of the machine) slowly towards you.

Next, open the face cover and pull the thread down and through another hooky thing located at the very bottom of that whole inside-the face-cover section of the machine (Step G). Close the face cover.

Keep pulling down and pass the thread through a final hooky-loopy thing located at the base of the needle bar (Step H).

Now, get ready. You're about to complete the circuit of hooky-loopy things and actually thread the needle of the machine. The diagram combines this step with Step H above but I think it deserves its own Step. After all, it is the gateway Step to effectively and efficiently stitching up all kind of wonderfulness. I know you can hardly stand the anticipation anymore, so without further ado....

Find the eye of the needle. It's just above the pointy end. Pull the thread down so you have a little slack. Then pass the end of the thread through the eye and pull it toward the back of the machine.

You did it! Make yourself a cup of tea and relax for a while before moving onto the final set of precursor steps to learning to sew on a machine, namely, inserting the bobbin into the bobbin case and uniting the bobbin thread with the thread you just threaded. What?! Don't worry, I'll explain.

Until next time --


Linda

Egghead Learns to Sew, Part II


In this installment of my klutzy-bookish guide to learning to sew on a machine, I explain how to wind a bobbin. For those of you who never took sewing in school, the bobbin is essentially the spool of thread that contributes the bottom stitch. While it's not really necessary to wind your own bobbin --- you can buy them pre-wound --- I thought the process of doing so would be a manageable way to introduce thread and electricity to the post-it labeled parts of my machine and thus, to dip my toe into actually using it.

I began by identifying the relevant parts: the spool pin, bobbin winder tension knob, bobbin winder spindle, bobbin-winder stop, and the stop clutch knob. The diagram above shows these parts in relation to each other, albeit from the back of the machine (which, incidentally, I found confusing; the owner's manual is my friend, but, it turns out, not the most reliable one, alas). The pictures below show what these parts actually look like.


It took me poking around for awhile to figure out how to extend the spool pin so it was long enough to hold a spool of thread. Once I scaled that hurdle I followed the instructions in the owner's manual and placed the bobbin on the bobbin winder spindle, pushed the spindle to the right to engage it, and released the clutch.


Next I plugged the machine in. Ack! Electricity! We're getting serious now. I paused to collect myself and then put my spool of thread on the spool pin and wound the thread twice around the bobbin winder tension knob. The owner's manual didn't explain how exactly to attach the end of the thread to the bobbin so I just wrapped it around a few times and hoped for the best.


I depressed the foot control and lo! The thread began to wind itself around the bobbin! I marveled at how evenly the the thread distributed itself. I was also impressed that the machine knew when the bobbin was full. When the bobbin winder stop stopped turning, I was done. Nothing got jammed up or tangled. Yay!


I snipped the end of the thread with a scissor, removed the bobbin from the bobbin winder spindle, and felt accomplished. And relieved.


Until next time, when I go inside the machine to insert the bobbin, and thread the upper thread into the needle --


Linda