Baby, It's Cold Outside :: A Baby Leg Warmer How-To!
As a mom of a ten-month old, it's very tempting to keep my daughter in her pajamas all day during the winter. Pajamas are easy. They make diaper changes a snap. They keep her warm. But what about all those cute dresses and long-sleeved onesies lying dormant in her clothing baskets? Will I be forced to tell Aunt Edna that I never got around to putting my daughter in that awesome dress she gave us at our baby shower because it was too cold (or, ahem, that I was too lazy)?
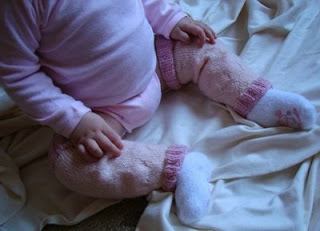
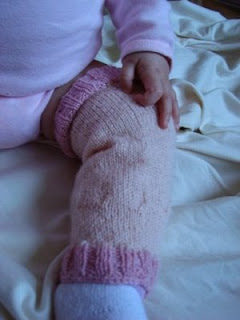
Thankfully, there is a solution to this age old problem that I'm sure is plaguing all of us at night. Baby legwarmers are the solution to style, comfort, and ease in these cold winter months. They don't have to be removed while changing diapers, and they keep chubby baby legs toasty and protected. They look really cool with a dress. You will definitely be labeled as the cool mom.
The pattern for baby legwarmers is quite easy, and you can easily use leftover yarn (you will need about 40 grams total). Just a small caution: this project requires small knitting needles and fingerling yarn, so progress might be a little slow. But rest assured, the end product is well worth the work!
Baby Legwarmers (fits babies 0 - 18 months, maybe longer!)
Materials:
1 set of US #2 double-pointed needles
Fingerling yarn in two colors (I used Lanette Superwash in Peach and Mauve. You can make 2 sets of baby legwarmers if you alternate the colors.)
Directions:
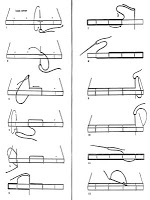
1. Cast on 60 stitches in Mauve, making sure stitches are loose
2. Distribute the stitches evenly on three needles (20 stitches per needle) and join in a circle
3. Knit 2x2 rib for 1.5 inches
4. Switch to Peach yarn and do straight stockinette stitch until 5 inches long from cast on
6. *K5, K2tog and repeat from * to end of round
7. *K4, K2tog and repeat from * to end of round
8. Knit straight for another 2 inches
9. *K3, K2tog and repeat from * to end of round
10. Switch back to Mauve yarn
11. Knit 2x2 rib for another 1.5 inches
12. Bind off
13. Repeat for other side
Stay warm!
Karina
Windows of Agate
Thankfully, there is a solution to this age old problem that I'm sure is plaguing all of us at night. Baby legwarmers are the solution to style, comfort, and ease in these cold winter months. They don't have to be removed while changing diapers, and they keep chubby baby legs toasty and protected. They look really cool with a dress. You will definitely be labeled as the cool mom.
The pattern for baby legwarmers is quite easy, and you can easily use leftover yarn (you will need about 40 grams total). Just a small caution: this project requires small knitting needles and fingerling yarn, so progress might be a little slow. But rest assured, the end product is well worth the work!
Baby Legwarmers (fits babies 0 - 18 months, maybe longer!)
Materials:
1 set of US #2 double-pointed needles
Fingerling yarn in two colors (I used Lanette Superwash in Peach and Mauve. You can make 2 sets of baby legwarmers if you alternate the colors.)
Directions:
1. Cast on 60 stitches in Mauve, making sure stitches are loose
2. Distribute the stitches evenly on three needles (20 stitches per needle) and join in a circle
3. Knit 2x2 rib for 1.5 inches
4. Switch to Peach yarn and do straight stockinette stitch until 5 inches long from cast on
6. *K5, K2tog and repeat from * to end of round
7. *K4, K2tog and repeat from * to end of round
8. Knit straight for another 2 inches
9. *K3, K2tog and repeat from * to end of round
10. Switch back to Mauve yarn
11. Knit 2x2 rib for another 1.5 inches
12. Bind off
13. Repeat for other side
Stay warm!
Karina
Windows of Agate