
Crafting in Japanese
First off, I do not speak Japanese. However, that has not prevented me from acquiring a growing Japanese craft book collection. To keep this addiction in check I try to limit myself to two trips a year to Kinokuniya a Japanese book store on 6th Avenue and 40th Street. Descend into their basement level and you will find an extensive collection of craft books for all kinds of disciplines. Interested in sewing a smart little chapeau? There's a book for that. Want to needle felt a zoo of critters? There's a book for that, as well as shelves of sewing, knitting, crocheting, embroidery, jewelry and paper craft books. These are some of my recent finds:
I had to get this embroidery book because of a serious fascination with the creepy crawly.
And how can you resist all these pretty flowers?
So far, I've found that most books have very detailed diagrams making it possible to figure out how to make something without having to read the instructions. In addition, there are several resources to help you along.
Now that I've shared my craft book affliction, what kind of craft books do you like and where do you find them?
 Simone
groundsel.etsy.com
I had to get this embroidery book because of a serious fascination with the creepy crawly.
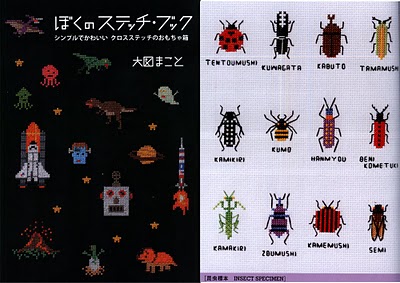 |
| ISBN 978-4-86191-352-5 |
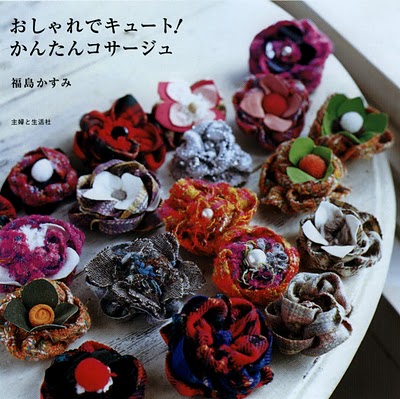 |
| ISBN 978-4-391-13164-2 |
Finding the Books
Craftlog has a detailed list of online sources for Japanese books and a list of books by ISBN number. Sweet Sassafras also provided a post on how to buy books. Especially helpful is her link to the Inspiring Images From Craft Books Flickr Pool allowing you to virtually browse the books and identify them by ISBN number.Language
Sometimes a picture is not worth a thousand words. For those instances when you really need a translation, Felt Cafe Japan has assembled a glossary of Japanese sewing, knitting, crocheting, and beading terms.Now that I've shared my craft book affliction, what kind of craft books do you like and where do you find them?
Simonegroundsel.etsy.com
A Four-Hole Binding How-to
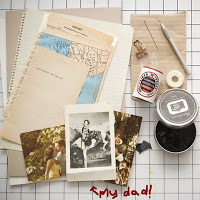
Here's a great way to compliment all your etsy gifts and in a pinch this can serve as a last minute gift too. This binding is simple, elegant and adds a unique touch to the everyday card or book. You can use single sheets of paper, so you can use smaller pieces of paper, even scraps. You can use as many pages as you’d like, for a little book, or a few, like I’m doing now, to make a card. This ones for my pops.
 Heres what you’ll need:
+ a selection of papers (best to have heavy stock papers for the covers)
+ thread, linen thread is best but floss will work well too. Cotton/sewing thread can be used too, but be careful not to pull too tight or you can rip your paper.
+ heavy weight needle (to poke holes)
+ awl
+ binder clip
+ cardboard
+ ruler
+ embellishments- photo corners, pictures, paper scraps, anything you’d like…
Prep: Gather your supplies and papers to bind. Cut pages to the size you want and embellish as you’d like. I’m using scraps of vintage lined paper, so I can write a note, and photographs with photo corners. Think about having a combo of lined, blank and decorative pages. Keep in mind that the binding will fall on the left hand side, the spine, so leave 3/8 inch for this. It’s better to do whatever writing/decorating before binding.
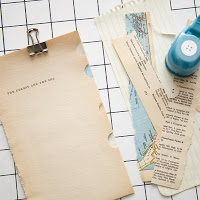
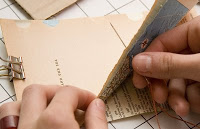
1.Order your pages and with a binder clip secure them together to keep them from wiggling around. Score or draw a faint line 3/8 inch from the spine to mark the line you’ll stitch.
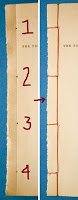
2.Place pages on the cardboard and punch holes with an awl or heavy weight needle along the 3/8 inch line. You can eye ball it or measure out four evenly placed holes. Like this----->
 <--3. Knot the end of the thread and you’re ready to bind. Remember to pull the thread taunt but not too tight, because you can rip the paper. (You can follow these steps and images here or use this detailed diagram, at right and click to enlarge. This might sound complicated, but really it's so, so easy. Just try it!)
 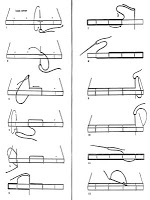 In hole 3 insert the needle in between the center pages and come out through the top of the book.
4. Make a loop around the spine of the book and into hole 3 again. Your thread and needle are now at the top of the book.------>
5. Pull the needle down through hole 2, from the top to the bottom of the book. Again loop around the spine and pull the needle through hole 2 once more. Needle and thread will be at the back of the book.

 6. Repeat step 5 for hole 1, but after you loop around the spine now loop around the top of the book. You will pass through hole 1 three times. Once you’ve done that your needle and thread are at the top of the book. (image right)
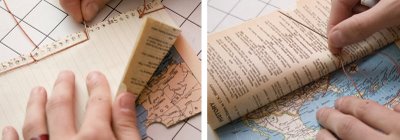
7. Now pass down through hole 2, from the top to the bottom of the book, up through hole three, and down through hole 4. You are basically stitching down the book filling in the gaps.
8. At hole 4 make a loop around the spine, bringing the needle up form the bottom of the book and then down through the top. Loop around the bottom of the book, needle passing from bottom to top.
 <---9. Last step… You’re ready to complete the binding by returning to the original sewing station, hole 2. Instead of pulling the needle and thread all the way through hole 2 pierce the hole from the back of the book towards the top, but only go to the center of the book—just like when you started. Meet the begining thread and tie a knot to finish.
10. Did! Done! You’re great…. Make it happen!
If you have time I hope you’ll try this . I know you’ll love what you make and so will those who you share it with! While it would be great, not everyone has the time to devote to making so check out warpeDesign, waisze and JournalisticTendency for great cards and books.
Thanks and I hope you enjoyed this!
Jessica
MiniatureRhino
Heres what you’ll need:+ a selection of papers (best to have heavy stock papers for the covers)
+ thread, linen thread is best but floss will work well too. Cotton/sewing thread can be used too, but be careful not to pull too tight or you can rip your paper.
+ heavy weight needle (to poke holes)
+ awl
+ binder clip
+ cardboard
+ ruler
+ embellishments- photo corners, pictures, paper scraps, anything you’d like…
Prep: Gather your supplies and papers to bind. Cut pages to the size you want and embellish as you’d like. I’m using scraps of vintage lined paper, so I can write a note, and photographs with photo corners. Think about having a combo of lined, blank and decorative pages. Keep in mind that the binding will fall on the left hand side, the spine, so leave 3/8 inch for this. It’s better to do whatever writing/decorating before binding.
1.Order your pages and with a binder clip secure them together to keep them from wiggling around. Score or draw a faint line 3/8 inch from the spine to mark the line you’ll stitch.
2.Place pages on the cardboard and punch holes with an awl or heavy weight needle along the 3/8 inch line. You can eye ball it or measure out four evenly placed holes. Like this----->
<--3. Knot the end of the thread and you’re ready to bind. Remember to pull the thread taunt but not too tight, because you can rip the paper. (You can follow these steps and images here or use this detailed diagram, at right and click to enlarge. This might sound complicated, but really it's so, so easy. Just try it!) In hole 3 insert the needle in between the center pages and come out through the top of the book. 4. Make a loop around the spine of the book and into hole 3 again. Your thread and needle are now at the top of the book.------>
5. Pull the needle down through hole 2, from the top to the bottom of the book. Again loop around the spine and pull the needle through hole 2 once more. Needle and thread will be at the back of the book.
6. Repeat step 5 for hole 1, but after you loop around the spine now loop around the top of the book. You will pass through hole 1 three times. Once you’ve done that your needle and thread are at the top of the book. (image right)7. Now pass down through hole 2, from the top to the bottom of the book, up through hole three, and down through hole 4. You are basically stitching down the book filling in the gaps.
8. At hole 4 make a loop around the spine, bringing the needle up form the bottom of the book and then down through the top. Loop around the bottom of the book, needle passing from bottom to top.
<---9. Last step… You’re ready to complete the binding by returning to the original sewing station, hole 2. Instead of pulling the needle and thread all the way through hole 2 pierce the hole from the back of the book towards the top, but only go to the center of the book—just like when you started. Meet the begining thread and tie a knot to finish. 10. Did! Done! You’re great…. Make it happen!
If you have time I hope you’ll try this . I know you’ll love what you make and so will those who you share it with! While it would be great, not everyone has the time to devote to making so check out warpeDesign, waisze and JournalisticTendency for great cards and books.
Thanks and I hope you enjoyed this!
Jessica
MiniatureRhino