Sewing Tutorial: Father's Day Pocket Square

Father's Day is coming up, June 16th, and I wanted to share a special and easy gift you can make for the dad in your life.  And this doesn't have to be just for dads, my friend Kayte loves these pocket squares for herself.  She uses them all the time especially in the New York City humid summers.   If you are a beginning sewer this is a great project for you.

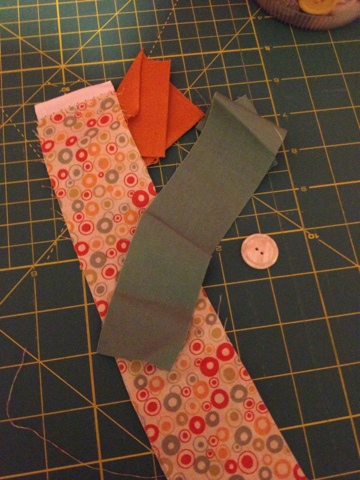
The key ingredient for this pocket square is you want very soft cotton.  I used Liberty of London which is called a Lawn Fabric.  The count is high, which means there are a lot of very fine threads per inch making it softer (think of high count bedding sheets). Robert Kaufman, a popular fabric manufacturer, also makes a lawn fabric in solid colors.

  • Materials:
  • 1/2 yard of fabric ( you will be using a 12" square but stores usually require you buy a minimum)
  • matching cotton machine thread
  • size 8 needle
  • fine pins

Step 1:

Cut out a 12" square and iron.  Fold over 1/4" twice on 2 opposite ends.  I pin down, iron, then secure the pins into the fabric.

Step 2: where the raw edge meets the now folded edged, fold in the corner at an angle, this way your corners will be nice and neat and have no fabric overhang. Repeat step one, fold over 1/4" seam allowance twice.

step 2 - fold corner at angle

Step 3: all fabric is pinned down. Because this is such a skinny seam allowance I do pin it parallel to the seam. Normally in the classes I teach I tell my students pins should be perpendicular so the pins can be pulled out while you sew or the needle can jump the pins.

step 3 - pinned down on all 4 sides.

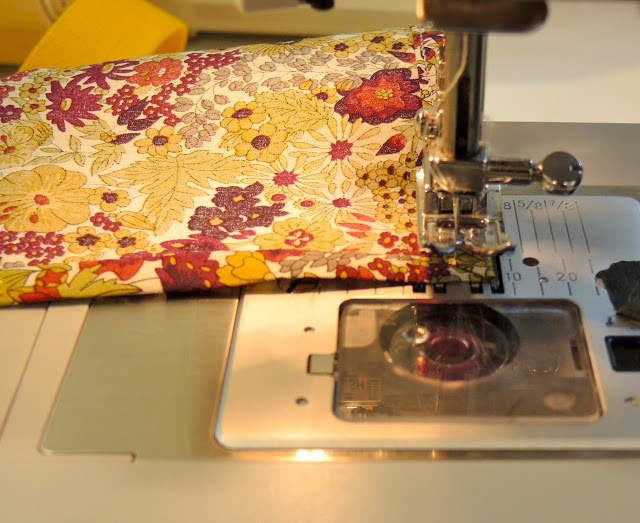
Step 4: Sew on the inside fold. This ends up being about 1/4" seam allowance.  If you are using the Liberty of London or the Robert Kaufman Lawn fabrics use a size 8 needle since it is finer.  Start your sewing somewhere in the middle, not on a corner.  This reduces the risk of the fabric getting bunched up on a corner or pushed down into the machine.

step 4 sewing

 Step 5: when you reach a corner, sew to the end and back stitch to the beginning of the fold.  Leave the needle in, pick presser foot up and pivot.  Sew down the next seam. Repeat on all corners.

step 5 turn the corners

Step 6 all finished, iron and steam and gift!

The fabric I used is the Liberty of London Margaret Annie in color purple green.  And remember to pre-wash your fabric.

Enjoy!

Tracey Toole

www.traceytoole.etsy.com

http://traceytoole.blogspot.com/

Broccoli Dreams: Printing with Veggies

In search of a fun baby shower gift, I rummaged through my refrigerator and found some veggies to print baby onesies. So here it goes:

Materials

  • Onesies (or anything else you want to print)
  • Fabric Paint
  • Veggies and fruit (broccoli, lemons, apples, celery, mushrooms)
  • Cardstock 

Steps

1. Brush the print side of the vegetable with a thin layer of paint. 

2. On a piece of scrap paper practice printing with your vegetable to get a feel for what it will look like and how much paint you want to use. Here I printed with broccoli, lemons, mushrooms and celery.

3. Once you feel ready to commit to fabric, lay out the onesie and slide a piece of cardstock between the front and the back of the t-shirt to prevent the paint from leaking through the fabric. Brush the paint on your veggie and go for it.

Here are some examples:

Lemon Sun

Celery Smile (The hair was printed with the celery ribs)

Apple Buttons (slice the apple in half to expose the star shaped seed center)

Broccoli Trees (slice the broccoli lengthwise to get a flat surface)

Lemon Boat

4. Lay out your onesies to dry. Once dry, heat set the paint in a hot dryer for about 30 min.

That's it, a really simple OOAK baby shower gift. You could also print paper, diapers, napkins, table clothes, dish towels. . . I'm sure you can come up with a huge list of things. Have fun,

Eat Your Veggies

This spring I will visit my adorable almost one-year old niece. I've been thinking about what to bring her and decided to make her some veggies since she's the only baby I know who actually likes eating her broccoli.

May I introduce: Madame Aubergine, the adorable pea-pod triplets Henri, Jaques, and Felix, Grand Mere Carotte, and Tante Tomato. They will soon be joined by Monsieur Brocoli.

This nutritious bunch would have not come into being without the generous contributions of these fellow bloggers who shared their patterns.

The pea-pod triplets are based on a pattern by Yarrn. Grand Mere Carotte is part of a collection of Easter themed patterns by Midnight Knitter. Madame Aubergine's pattern was provided by Lion Brand a long time supporter of our team.

I more or less made up the tomato on the fly. It's a basic amigurumi ball

For the Fruit

  • Chain 2
  • 6 sc in first ch.
  • 2 sc in each stitch - 12 st
  • *sc, 2 sc in next stitch* repeat - 18 st
  • *sc, sc, 2 sc in next stitch* repeat - 24 st
  • *sc, sc, sc, 2sc in next stitch* repeat - 30 st
  • Crochet 3 rounds of sc in each stitch
  • *sc 2 together, sc, sc, sc* repeat - 24
  • *sc 2 together sc, sc* repeat - 18
  • *sc 2 together sc, s* repeat 12 (at this point you probably want to start stuffing the tomato before the opening gets too small)
  • *sc 2 together* repeat 6
  • Sew up the top

For the leaf

  • Chain 2
  • 5 sc in first stitch
  • Crochet 2 rounds of sc
  • 2 sc in each stitch - 10 stitches
  • *sc, 2 sc in next stitch* repeat - 15 stitches
  • *sl, chain 8, sc in 7th chain and work a total of 6 sc back down the chain, sl, sl* 5 times.

Sew the leaf to the top and embroider the face onto the tomato.

Have fun

Tutorial: Stenciled Spring Shades

It seems that every time we upgrade something around the house another project is calling out to me. After we painted our kitchen, it was painfully obvious that we needed new window shades. It was equally obvious that these shades had to fit a minuscule budget. In the end I decided on plain white, stenciled shades - one of a kind, within budget, perfectly matched to the new color scheme!

Instructions

What you need:

  • A plain shade. The big box stores will cut it to size for you.
  • Acrylic paint. I used leftover paint from my kitchen "remodel" and a paint sample
  • Stencils (Thank you Martha)
  • Spray mount
  • Sponges to sponge on the paint and something to pour the paint into

The Process

Roll out the shade and place it on your work surface. Because I'm lazy I only stencil the shade to fit the actual window opening. I leave the part that no one will ever, ever see blank.

Lightly spray adhesive on the back of the stencil. (Do this in a place that's easy to clean up. There may be spray over and you don't want to get that on your shade.) Place the stencil on the shade flattening out the stencil.

Pour a little of the paint in a dish and dip your sponge in. At first use paint sparingly until you get a feel for how much you will need to cover the stencil. Starting from the middle of the stencil begin sponging on the paint.

Once you've covered the stencil with paint, carefully pull off the stencil and place it on a different part of the shade. You don't have to re-apply the spray mount. The back of the stencil should maintain its tackiness through the whole project.

Continue in this manner until you're satisfied with your project. I was using two colors and two stencils. First I stenciled all the large blue shapes, then I washed off the large stencil, re-applied some spray mount, and continued with the red paint. I used the same process to fill in the spaces between the large shapes using the smaller stencil.

One more window to go. . .

Fabric Covered Buttons

As you can see, I've got a lot of buttons in my stash. Unfortunately, sometimes none of them will work for a particular crafty project I may be working on. Last September, I decided to finally replace a missing button on a jacket. I headed down to a button store in the garment district and ended up buying a button for $3. Yes, $3 for one button. I found the price to be ridiculous, but I had no choice. A few months later, I came across instructions online to create fabric covered buttons....so I will never pay $3 for a button again!

First, pull out your stash of fabric scraps. It doesn't take a lot of fabric, so there is probably something in the fabric stash that will be useful. I decided to use the greenish-colored fabric (seafoam) because I had no buttons that matched the fabric.

Measure the distance from the edge of the button to the middle of the button. You want the fabric to be able to reach the middle so you can completely cover the button.

I traced a circle on the fabric around the button, making sure that there was at least 1/2 inch extra all around.

Then, I cut the fabric. My measurements were pretty close, but it wasn't necessary to be exact.

Taking a needle and thread, I used a running stitch (I think that's what it's called) and stitched along the perimeter of the fabric circle.

After placing the button in the middle of the fabric circle, pull the thread taut so the fabric gathers around the button and covers it completely.

You can even trim a bit of the fabric around the outside of the stitches to reduce the amount of bulk behind the button. You don't want too much fabric because you want the button to lay as flat as possible when you use it.

Continue to stitch up the fabric until it is taut around the button. Knot off the thread, and you are done! A beautiful button for whatever project you are working on!

Until next time....happy crafting!

Nordea nordeasoaperie

Quick & Easy DIY Fabric Coasters

Now that I have a new obsession in sewing, I am starting to find all sorts of fun projects to work on. I happen to have a weakness for coasters. I have them all over my apartment, and I always have some on my table at craft fairs (so that customers can put down their drinks and pick up my soap!) So, here is a quick and easy tutorial that anyone can do:

First, I cut out four squares of fabric for the top portion (an old pair of jeans!) and another four squares in a coordinating fabric (the same size) for the bottom portion.

Then I cut out four squares of batting slightly smaller for the padding.

Then I cut four strips of colorful ribbon that would fit across the front of the top square. I glue it on to keep it in place before sewing.

Using my trusty machine, I sew the colorful ribbon strip onto the front of each top square.

Then, I glue the batting onto the back of each bottom square.

I place the top and bottom squares (right sides facing each other) together and pin them in place before sewing them up. You want the right sides to face each other because you need to leave a 1.5" section open so you can turn the completed square inside out. If you look closely, you can see where I marked my opening in blue marker near the top of the square.

After you turn the square inside out, the right sides should be facing out, and you simply need to hand stitch the small opening to finish it up.

So there you have it....easy peasy fabric coasters! Great for a quick housewarming gift, or if you are heading to a friend's house for dinner...I always like to show up with a little gift of appreciation!

Until next time....happy crafting!

Nordea / nordeasoaperie