Eco-Friendly and Natural Cleaning Recipes To Use In Your Home and Office

Just in time for the Holidays, when you may have more dirt around thanks to more-than-normal foot traffic, and closed windows keeping out the cold weather, I'm providing you with eco-friendly and natural cleaning recipes to use to keep your home and office clean and chemical free.  Some of you may already know these agents, or have them in your cupboard. If you don't, next time you're at the store pick them up!


I know that some of you may be thinking, but what about scents? We want our apartment to smell like cinnamon (go buy some cinnamon sticks!), or gingerbread (bake some, the smell will linger for hours!), or pine tree (buy a real tree, just make sure you recycle it according to your city and state recycling laws). If you go the natural route in regards to scenting your home, you'll avoid the fake chemical scents in over-the-counter products like candles (not all), soaps, deodorizers, sprays and yes, cleaning products.

What I mean by fake chemical scents is that most of these products contain harsh chemicals that have been linked to causing breathing problems in all beings, adults, children and pets. The other thing to remember is that these scents linger over time and the more you use them, the more damage they are doing to your health.  As noted on TheDailyGreen, "These chemicals can produce indoor air pollution by off-gassing toxic fumes that can irritate eyes and lungs. (Children and pets are most at risk.) Many cleaners also contain unnecessary antibacterial agents (pesticides, technically), that can actually make bacteria stronger, and more resistant to antibacterial drugs." 

With that in mind, lets make some natural cleaners! 

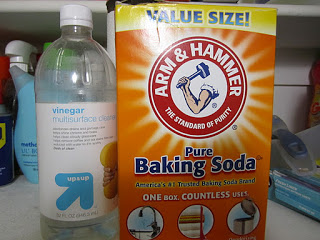
Just an FYI, I bought both my large container of baking soda and vinegar from the cleaning isles at Target. These items are by no means expensive, and while I myself use Seventh Generation products and Method on occasion, I am aware that they are not always in everyone's budget.  


The great thing about the recipes provided below (thank you TheDailyGreen!) is that items like baking soda, don't have a scent, but is a great deodorizer and vinegar, while doesn't smell too good at first, wears off in no-time and is one of the best cleaning agents around, especially for glass. I tell you this in case you decide that vinegar and baking soda might not go well with the scents of cinnamon and gingerbread. It is not true! You'll be fine and that lack of, or lingering scent will make your nose happier. 

All these recipes require are the following items: 
  • Baking Soda
  • Vinegar
  • Water
  • Spray Bottle 
  • Lemon Juice (good substitute for vinegar) 
  • Liquid Soap
  • Tea Tree Oil
  • Kosher Salt
  • Club Soda (great for carpet stains!)


General Cleaning (kitchens and bathrooms):
Baking Soda and Water: Dust surfaces with baking soda, then scrub with a moist sponge or cloth. If you have tougher grime, sprinkle on some kosher salt, and work up some elbow grease. 
Lemon Juice or Vinegar: Got stains, mildew or grease streaks? Spray or douse with lemon juice or vinegar. Let sit a few minutes, then scrub with a stiff brush. 
Disinfectant: Instead of bleach, make your own disinfectant by mixing 2 cups of water, 3 tablespoons of liquid soap and 20 to 30 drops of tea tree oil.
Kosher Salt and Water: If you need a tougher abrasive, sprinkle on kosher salt and scrub with a wet cloth or sponge. 

Oven Cleaning:
Baking Soda and Water: Coat the inside of your dirty appliance with a paste made from water and baking soda. Let stand overnight. Then, don gloves and scour off that grime. Make spotless with a moist cloth.

Windows and Mirrors:
White Vinegar, Water and Newspaper: Mix 2 tablespoons of white vinegar with a gallon of water, and dispense into a used spray bottle. Squirt on, then scrub with newspaper, not paper towels, which cause streaking. If you're out of vinegar or don't like its smell, you can substitute undiluted lemon juice or club soda.

Carpets:
Club Soda: You've probably heard the old adage that club soda works well on carpet stains. But you have to attack the mess right away. Lift off any solids, then liberally pour on club soda. Blot with an old rag. The soda's carbonation brings the spill to the surface, and the salts in the soda thwart staining. 
Cornmeal: For big spills, dump cornmeal on the mess, wait 5 to 15 minutes, and vacuum up the gunk.
Spot Cleaner: Make your own by mixing: 1/4 cup liquid soap or detergent in a blender, with 1/3 cup water. Mix until foamy. Spray on, then rinse with vinegar. 
To Deodorize: Sprinkle baking soda or cornstarch on the carpet or rug, using about 1 cup per medium-sized room. Vacuum after 30 minutes.

Wood Floors:
Vinegar: Whip up a solution of 1/4 cup white vinegar and 30 ounces of warm water. Put in a recycled spray bottle, then spray on a cotton rag or towel until lightly damp. Then mop your floors, scrubbing away any grime. 

Laundry: 
Baking Soda: Add a 1/2 cup of baking soda in with your normal cleaner - it's great for deodorizing and helps regulate the pH level in the washer water to keep it from being too acidic or alkaline. Additionally, it helps to boost the detergent you are using by making it work more effectively and reduce order causing bacteria. 

And don't forget, while you're cleaning and getting ready for Holiday festivities, be sure to pay attention to unwanted items and properly dispose of them-recycle what you can, donate what can be used again (there are many programs like the NY Cares Coat Drive in NY City that collects gently worn coats to give to individuals in need during the winter months), and consider this as you purchase items for the Holiday season.  

Next month, we'll discuss how to decorate your home, even though the Holiday season will be in full swing, without taxing the environment too much. Exciting, I know! We're going to get creative! 

Until December, Happy Thanksgiving! Enjoy your time with family, friends, and loved ones. 


On Being a Saver

As I've mentioned before, I'm a saver of things that might rightfully be considered trash and thrown away --- felt scraps, for example. But, per the felt scraps example, I save these things because of their potential to become something not-trash. I see their possibility for transformation. I know I'm not alone in this among crafty types.

Perhaps you can relate to the inherent quandary in being a crafty saver in the big city, namely, a lack of space to keep saved items. I often wish I could strike a better balance between my visions of possibility or intended use and the reality that saved things will likely hang around a good long awhile before I use them, thus contributing to the increasing clutter amid which I consequently live. Alas. Two illustrative examples of this:

1. Milk carton screw-caps, and


2. Lamp shades.

I started saving milk carton screw-caps with the intention of making wristlet pin cushions (they form the base). This was many, many months ago. But the caps are small so it's not a major burden on my space to keep saving them---yet. And the chances of my actually using them as intended are good: Wristlet pin cushions are well within my likely future crafting ventures. So this save is reasonable, if a little annoying when the caps overrun the area above the sink.

I have a harder time justifying the second save, two metal lampshades that I salvaged from floor lamps that pooped out on me. (Am I alone in going through floor lamps like nobody's business?) I saved them with the idea that I could use one or the other as a sun-shield for my scrabble-tile pendants when selling at outdoor craft shows and markets. But I haven't figured out how exactly to rig them up. As with the the screw-caps, it's been months and months since I had this idea, but unlike the screw-caps, these things take up space. I'm constantly moving them around so I clearly don't have any to spare for them. So this save really isn't justifiable: Major space burden coupled with only a vague idea for their use. But, oh, the potential! It's almost intoxicating. Help!

In addition to things I save for their potential transformative use, there are things I save because they're just so obviously useful, whether or not I actually use them. You can relate.  I'll discuss these in my next post. Enough confessional for one day!

Until then --

 Linda // Purty Bird


Top Five List for Recycling

Reduce, Reuse, Recycle.

We hear those words evermore these days, not just for the sake of the environment, but also for the sake of our wallets.

I absolutely try to reuse anything and everything that is meant to be disposable.

And so here is my top five list for recycling items that you normally might just throw away: (In no particular order)

1. Empty cereal boxes, the kind that have an inner liner where the food is held. This is one of my favorites! What I like to do is carefully dis-assemble the box and re-assemble it inside out so that I have a box that I can either use for gift giving, shipping items in, or even just storage for small items. If you choose to use it as a shipment box, make sure you put a label over any writing that might be inside the box, otherwise that box is ready to be labeled and shipped.

2. If you don't already save them, the plastic container that your wonton soup arrived in would make an excellent storage container, and not just for food. They're great because they are see through and easily stacked.

3. Page-a-day desk calendars, the kind you rip off the comic or other with the day and probably crumple and toss. Not so fast! Collect those and use the non-printed side for scratch paper for your grocery list or other musing.

4. Lonesome sock, you know the kind, the one the dryer left lonely without a mate. Good news, our single sock now has a new life, as a dustrag, a puppet or sock monkey.

5. That pesky junk mail. Especially the kind with the envelopes for you to mail back applications and such. I use those envelopes to store receipts in, for different categories and write exactly what's in them.

What are some things that YOU give a second life to? Please share!

by Lorina Pellach-Ladrillono of http://www.beadscarf.com/ and http://beadscarf.etsy.com/

How-To: Making a Miniature Artist's Canvas

I have always been obsessed with creating miniature versions of the things I use in my everyday life. I think the extra focus required to make miniature objects imbues the tiny things I make with a special quality--as if they are more charged with meaning than they would be at their regular size. Another reason to spend your time making tiny stuff is that it doesn't take up a whole lot of space, which, if you have friends who live in small apartments and want to give them beautiful handmade things but don't want to burden them with a lot of clutter, is a very good thing!

This tutorial will teach you how to make dollhouse-sized blank artists' canvases from empty tissue, granola bar and cereal boxes, which you can then paint and add to friends' art collections. I am hoping I can spark a whole trendy miniature painting craze!

Here's what you will need:
-empty boxes made from thin cardboard that you otherwise would have tossed into the recycling
-muslin fabric
-white glue
-acrylic gesso
-a normal size brush for applying the gesso, plus teeny tiny ones for doing the actual painting
-acrylic paints
-a gridded acrylic ruler is helpful for making accurate right angles when cutting up your boxes

Step 1: Figure out what size you want your miniature canvas to be. You can just eyeball the size if you like, but if you want it to be the perfect size to fit into a dollhouse, you'll want to do a little math. The standard size for dollhouse accessories is 1/12 scale, which means that you want to divide all your regular measurements by 12. If the full-sized painting would be 18 by 24 inches, then you want to make your mini canvas 1 and 1/2 inches by 2 inches.


Step 2: Once you have cut your cardboard to size, spread it with a thin layer of white glue and stick it to a piece of muslin. Make sure that the sides of your canvas are parallel to the grain of the fabric.


Step 3: Fold the fabric around to the back of the canvas and glue it down.


Make sure the folded fabric edge is glued slightly inside the edges of the cardboard so it can't be seen from the front.


Step 4: When your glue has dried, paint your canvas with a thin layer of acrylic gesso. You want to make sure not to put the gesso on too thickly, because being able to see the grain of your muslin is crucial to having a miniature painting that looks like the full-sized version. If you want to have an especially texture-y canvas, try different types of fabric and see which one looks best.


Paint gesso on the edges & back as well.


That's it! These miniature canvases are so easy and fun to make that you can create hundreds of them in nearly no time, then invite some friends over to have a painting party.


Then you and your friends can have a miniature art show:


Stella (lookcloselypress)

Drawing the Curtain on Winter


I have a friend who I would consider to be my wardrobe refashion-enabler. Over the years I have gotten tons of “hand-me-downs” from her that often need just a little tweaking to be wearable. Sometimes she just provides the raw materials. This is one of those instances. She gave me a pretty flowered curtain that I’ve had lying about for a while as I waited for inspiration to strike. Spring is just starting to appear here in New York, so I thought that it might be time to cut into the lovely yellow and orange flowers. Now, normally I am a pattern-follower, but I thought that I would try a little improvisation on this project.

First I cut off the hem and the hanging sleeve. The fabric has a directional pattern so I folded the curtain in half, cut along the fold and rotated one layer so that the flowers were all headed in one direction.


I chose a basic a-line skirt that I like and used it as a very basic pattern. I lay the skirt on top of the fabric and cut around it, keeping the bottom quite wide so that the skirt would have more of a flare (surely all flowery skirts should be the swing-y kind).


Then I sewed up the two sides—adding a short zipper to the left side-seam—and tried the skirt on in order to improvised some darts. Voila!

It was done, but it was little boring.

It needed a little more zing and I apparently needed a little more of a challenge (it is wardrobe refashion challenge, after all.) I had a fair amount of fabric left over so I thought I would turn this from a simple a-line skirt to a slightly-less-simple gored skirt. I tried the skirt on again and decided where the gores should go. I folded the skirt in half with the side seams together and measured and marked a straight line parallel to the folds (the center front and back).


I then took a deep breath and cut long slits along these lines. Then I cut four triangular pieces of fabric from my scraps that were the same length as these slits in the skirt. I initially tried to insert the gores using lapped seams (these come up a lot in the vintage patterns that I like to use) but something about this technique made them look flat and I wanted a bouncy, swishy skirt. So I ripped out the seams and tried again by reinforcing the top of the slit with a little stay-stitching and then pinning and sewing the gores in one side at a time. I liked this result much more. It gives the gores a little more of a three-dimensional effect.

I am finally happy with the skirt though it still needs a proper hem and waistband (probably in some contrasty color) and I am waiting anxiously for spring to really arrive so that I may wear it out!


Tanya Luck(x4)

Cabin Fever Project #2: The T-Shirt Book Cover

by Lorina of The Original Beadscarf

Everytime my mother-in-law goes somewhere on vacation, she has this almost primal need to buy my husband and myself t-shirts emblazoned with the place she has just returned from. Now while it's very endearing of her to think of us, and I do graciously accept it, I never, ever wear them. However, I do tuck it away so that I might give those shirts a second life someday.

And so here's a nifty little project for you to try out, when you don't want to go out, when it's cold out. It's a take on the paper book cover that we were forced as kids to cover all our books with.

The T-Shirt Book Cover

You'll need:

t-shirt (preferably one with an interesting pattern, you can also try concert T's!)
book (that you want to cover)
good pair of scissors
tailor's chalk/pencil
tape measure
straight pins
needle and thread, (preferably a sewing machine)

How to:

1. Place your t-shirt on a flat surface and your book (open) on to the area you would like to use for your cover.


2. Measure the book and cut the t-shirt around the book while giving an allowance of 3" on the sides, and 1.5" on the top and bottom of the book, like so:


3. Fold the top and bottom excess edging parts in to create a sturdy and clean edge for your book cover and pin down like so:


4. Sew the edges down:

5. Fold and sew down the sides of the cover being very careful to get as close to the edge as possible (1/8"), this is where you create the "pocket" for the front and back covers of the book.

6. Put your swanky new book cover on your book!


7. Show off your fancy new book cover.....maybe even to the mother-in-law who gave you that tourist t-shirt, lest it inspire her to give you more t-shirts!!!! Enjoy!!!


For more great blogs from Lorina of The Original Beadscarf, click HERE!