How-To: Recycle Junk Mail into Paper Beads
With just a few pieces of basic equipment, you can turn your boring old junk mail into cute paper beads! These lightweight, bulky beads are great for making fun chunky jewelry, festive garlands, or a bead curtain to hang in your doorway (if you're feeling ambitious!)
Equipment:
- Kitchen blender
- 2 Buckets
- Large bowl or tub
- Sieve
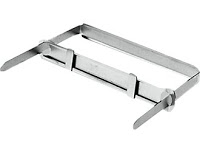
- Awl
- Cutting mat
- PVA (white) glue
- Acrylic gesso
- Acrylic paints
- Clear varnish
- Paintbrushes
- Paper for recycling.
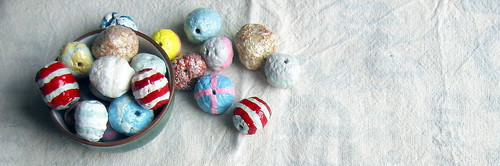
For this tutorial, I loosely packed a 1-gallon bucket about 3/4 full with scraps, which yielded around 100 beads ranging in size from 1/2"-1".
Ideal papers to use: anything printed on standard office paper, business envelopes, take-out menus with a matte finish, kraft paper.
Papers to avoid: glossy or coated papers such as magazine pages, waxed paper, newspapers and phonebooks (the ink is very messy and gross), facial tissue, paper towels.
NOTE: I recommend that you have dedicated equipment for home recycling/papermaking, rather than use the same items you use for food preparation. A good, used blender can easily be found at a thrift shop or yard sale. My rule is: if I use it for papermaking, I don't use it for food.
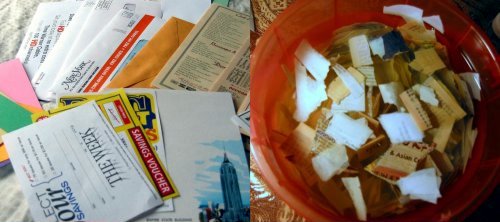
STEP 1: Tear paper into 1" scraps. Make sure you remove any staples and all plastic windows from business envelopes. Place torn scraps in a bucket, fill with water, and let it soak overnight.
STEP 2: Now it's time to make pulp! Put a couple of handfuls of paper into the blender and fill blender about half-full with water. Blend until the paper has the consistency of oatmeal, about 10 seconds. Place sieve over second bucket, and empty blender into sieve. After the pulp in the sieve has drained a bit, manually squeeze out excess water before transferring pulp to large bowl or tub. Repeat this step until all your scraps have been pulped, drained, and squeezed.
STEP 3: Add a nice big dollop of white glue to the pulp, mixing it in with your hands.
STEP 4: Roll yourself some beads! Take a bit of pulp and roll it into a little ball between your palms. This is the tricky part. If the pulp has too much water in it, it won't hold together. If it has too little water, it will be too crumbly to hold together, and your beads will break apart. Try rolling a couple beads and see how it goes. If the pulp is too wet to hold together, squeeze out more water. If the pulp is too crumbly, add back a little more water and some glue. You'll soon get a feel for the proper consistency, and it's easy to make little adjustments as you go. When in doubt, add more glue!
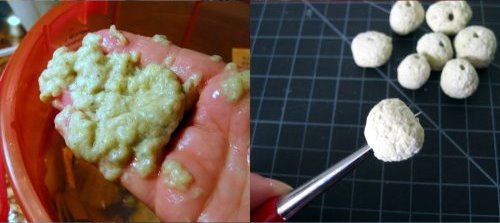
Once you've formed all your pulp into little balls, let them sit in a nice, out-of-the-way spot until they are dry as a bone.
STEP 5: Put holes in your beads with an awl. Working on a cutting mat to protect your work surface, hold the bead steady between your thumb and forefinger and press the awl slowly and firmly straight down through the bead.
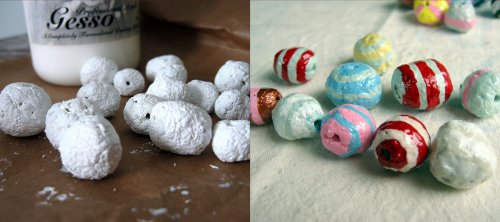
STEP 6: I like to prime my beads with a nice thick coat of undiluted gesso because it helps to smooth over the rough surface. This step isn't absolutely necessary, and you can go straight to decorating your beads with paint, if you want.
STEP 7: Grab your paints and brushes and go nuts!
STEP 8: When the paint is dry, you can brush on a coat of clear varnish to give your new beads a little added protection and shine.