
Wardrobe Refashion: How to Hem a Leather Garment

Leather is a material that I love for long-wearing garments because it only seems to get better as it ages. When my partner's mother gave me this leather jacket, I was thrilled, except for the fact that I couldn't see my own hands beneath the super long sleeves. Here are the steps I took to shorten the hem, and adjust the lining.

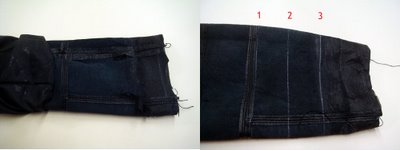 After measuring to see how much shorter I needed to go, and making a note of that measurement, I opened up the lining at the wrist to take a look at what was inside. I marked the length to shorten to as mark #2 all the way around. Mark #3 was where to cut for a 1 1/2" turn, and Mark #1 was that same 1 1/2" turn to align the cut edge.
 Next I cut a long 1" wide strip of iron-on interfacing to press just above my hem line. This step does double duty: it keeps the leather from stretching out over time, and it makes a crisp turn line. Alternately you can glue in a strip of any non-stretch woven fabric for the same effect.
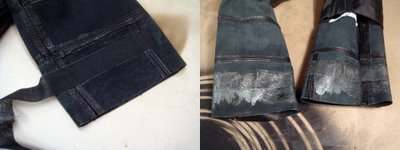
Using leather glue (rubber cement is a good alternative), I spread a thin, even layer about 2" wide right over where the hem would be. For the adhesive to work properly, let the glue dry until opaque and tacky before folding up the edge to your marked line.
 I used a roller to smooth the hem into a tight crease. Any burnishing tool, bone folder, or back of a spoon would also be useful for this step.
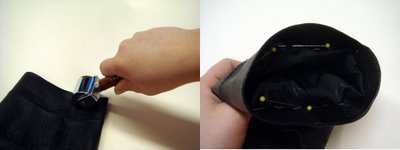
To ensure that my lining was long enough (it should be longer than the sleeve where it is attached to keep it from pulling), I thread-marked it where the hem was the same length, added 1/2" seam allowance and cut off the excess. I drew a line 1" up from the hem on the leather, and hand stitched in the lining along my thread-marked line.

This technique for hemming leather is equally useful for skirts or pants.
Like any good "after" shot, my smile is much bigger than before. Now I have a jacket that fits properly and will likely give me a decade of use.
 ~Kari
~Kari
http://ikyoto.etsy.com
After measuring to see how much shorter I needed to go, and making a note of that measurement, I opened up the lining at the wrist to take a look at what was inside. I marked the length to shorten to as mark #2 all the way around. Mark #3 was where to cut for a 1 1/2" turn, and Mark #1 was that same 1 1/2" turn to align the cut edge.Next I cut a long 1" wide strip of iron-on interfacing to press just above my hem line. This step does double duty: it keeps the leather from stretching out over time, and it makes a crisp turn line. Alternately you can glue in a strip of any non-stretch woven fabric for the same effect.Using leather glue (rubber cement is a good alternative), I spread a thin, even layer about 2" wide right over where the hem would be. For the adhesive to work properly, let the glue dry until opaque and tacky before folding up the edge to your marked line.
I used a roller to smooth the hem into a tight crease. Any burnishing tool, bone folder, or back of a spoon would also be useful for this step.To ensure that my lining was long enough (it should be longer than the sleeve where it is attached to keep it from pulling), I thread-marked it where the hem was the same length, added 1/2" seam allowance and cut off the excess. I drew a line 1" up from the hem on the leather, and hand stitched in the lining along my thread-marked line.
This technique for hemming leather is equally useful for skirts or pants.
Like any good "after" shot, my smile is much bigger than before. Now I have a jacket that fits properly and will likely give me a decade of use.
~Karihttp://ikyoto.etsy.com