DIY: Craft Fair Table Display

DIY: Craft Fair Table Display

This summer I decided to make a table display that had shelves for my craft items to sit on, and that could fit inside the largest luggage allowed by airlines without penalty.  My other requirements were that they would make use of height, since I could be selling from a 4' table space, be clamped to the table to withstand wind, and to be made from materials I already had around the house.  I have gone through so many different displays and selling so many different kinds of crafts, that I didn't want to spend any more money on my next wacky idea.  And since we have been over twenty years in our house, there were a lot of odds and ends that I could use; much of the wood came from a torn down tree-house or remnants from fixing up the old garage.  For this job I needed a table saw, a miter saw, a sander, a drill press, and cordless drills; I had plenty of screws and nails from previous projects, and all of these things I had bought previously.  I don't come from a handy family, and often I don't know the names of things I need or use.  Thanks to YouTube and HGTV, I plunge ahead into my very amateur woodworking adventures.

I plotted out the size after measuring my large luggage case, and decided it could be 27" high and 20" wide, with removable leg stands for clamping to the table. There would be three shelves, and the topmost rung would hold other beads/finials/box toppers.  When you build your own display, you can design it to show off exactly what you make.  For example, I have another display from re-used materials for jewelry, and for that I have rungs that are just right for hanging 16" necklaces on one shelf and 18" necklaces on the one below.

Old wood that have been in the yard for 17 years.  Re-Use!  Holes and old paint just add interest!

Cutting up all the pieces.  And all my tools are cheap - I'm not making fine furniture, after all.

Making the boxes for the leg stands

The assembled leg stand

Adding rims to the upper shelves

Drilling holes on the top rung.  I will put cut pieces of brass wire to put in them to hold my toppers. 

Attaching the shelves to the standing legs; because the shelves will fold flat, a strip of wood on the back will keep it in place when folded out, and so the shelf back hangs a little farther out than the leg. 

The shelves are attached with screws or glass headed screws (that I'd made for an earlier display - one that failed to work as planned!)

I measured the shelves to open to 90 degrees from the legs

And added stoppers underneath the shelves to keep them in place when in use

A wooden strip across the back also keeps the shelf in place and keeps things from falling off.

It works!  I decided I didn't need any rims yet for the lowest shelf.  I may put something there later.  The two top shelves hold very light objects, so they can be on the thin side.

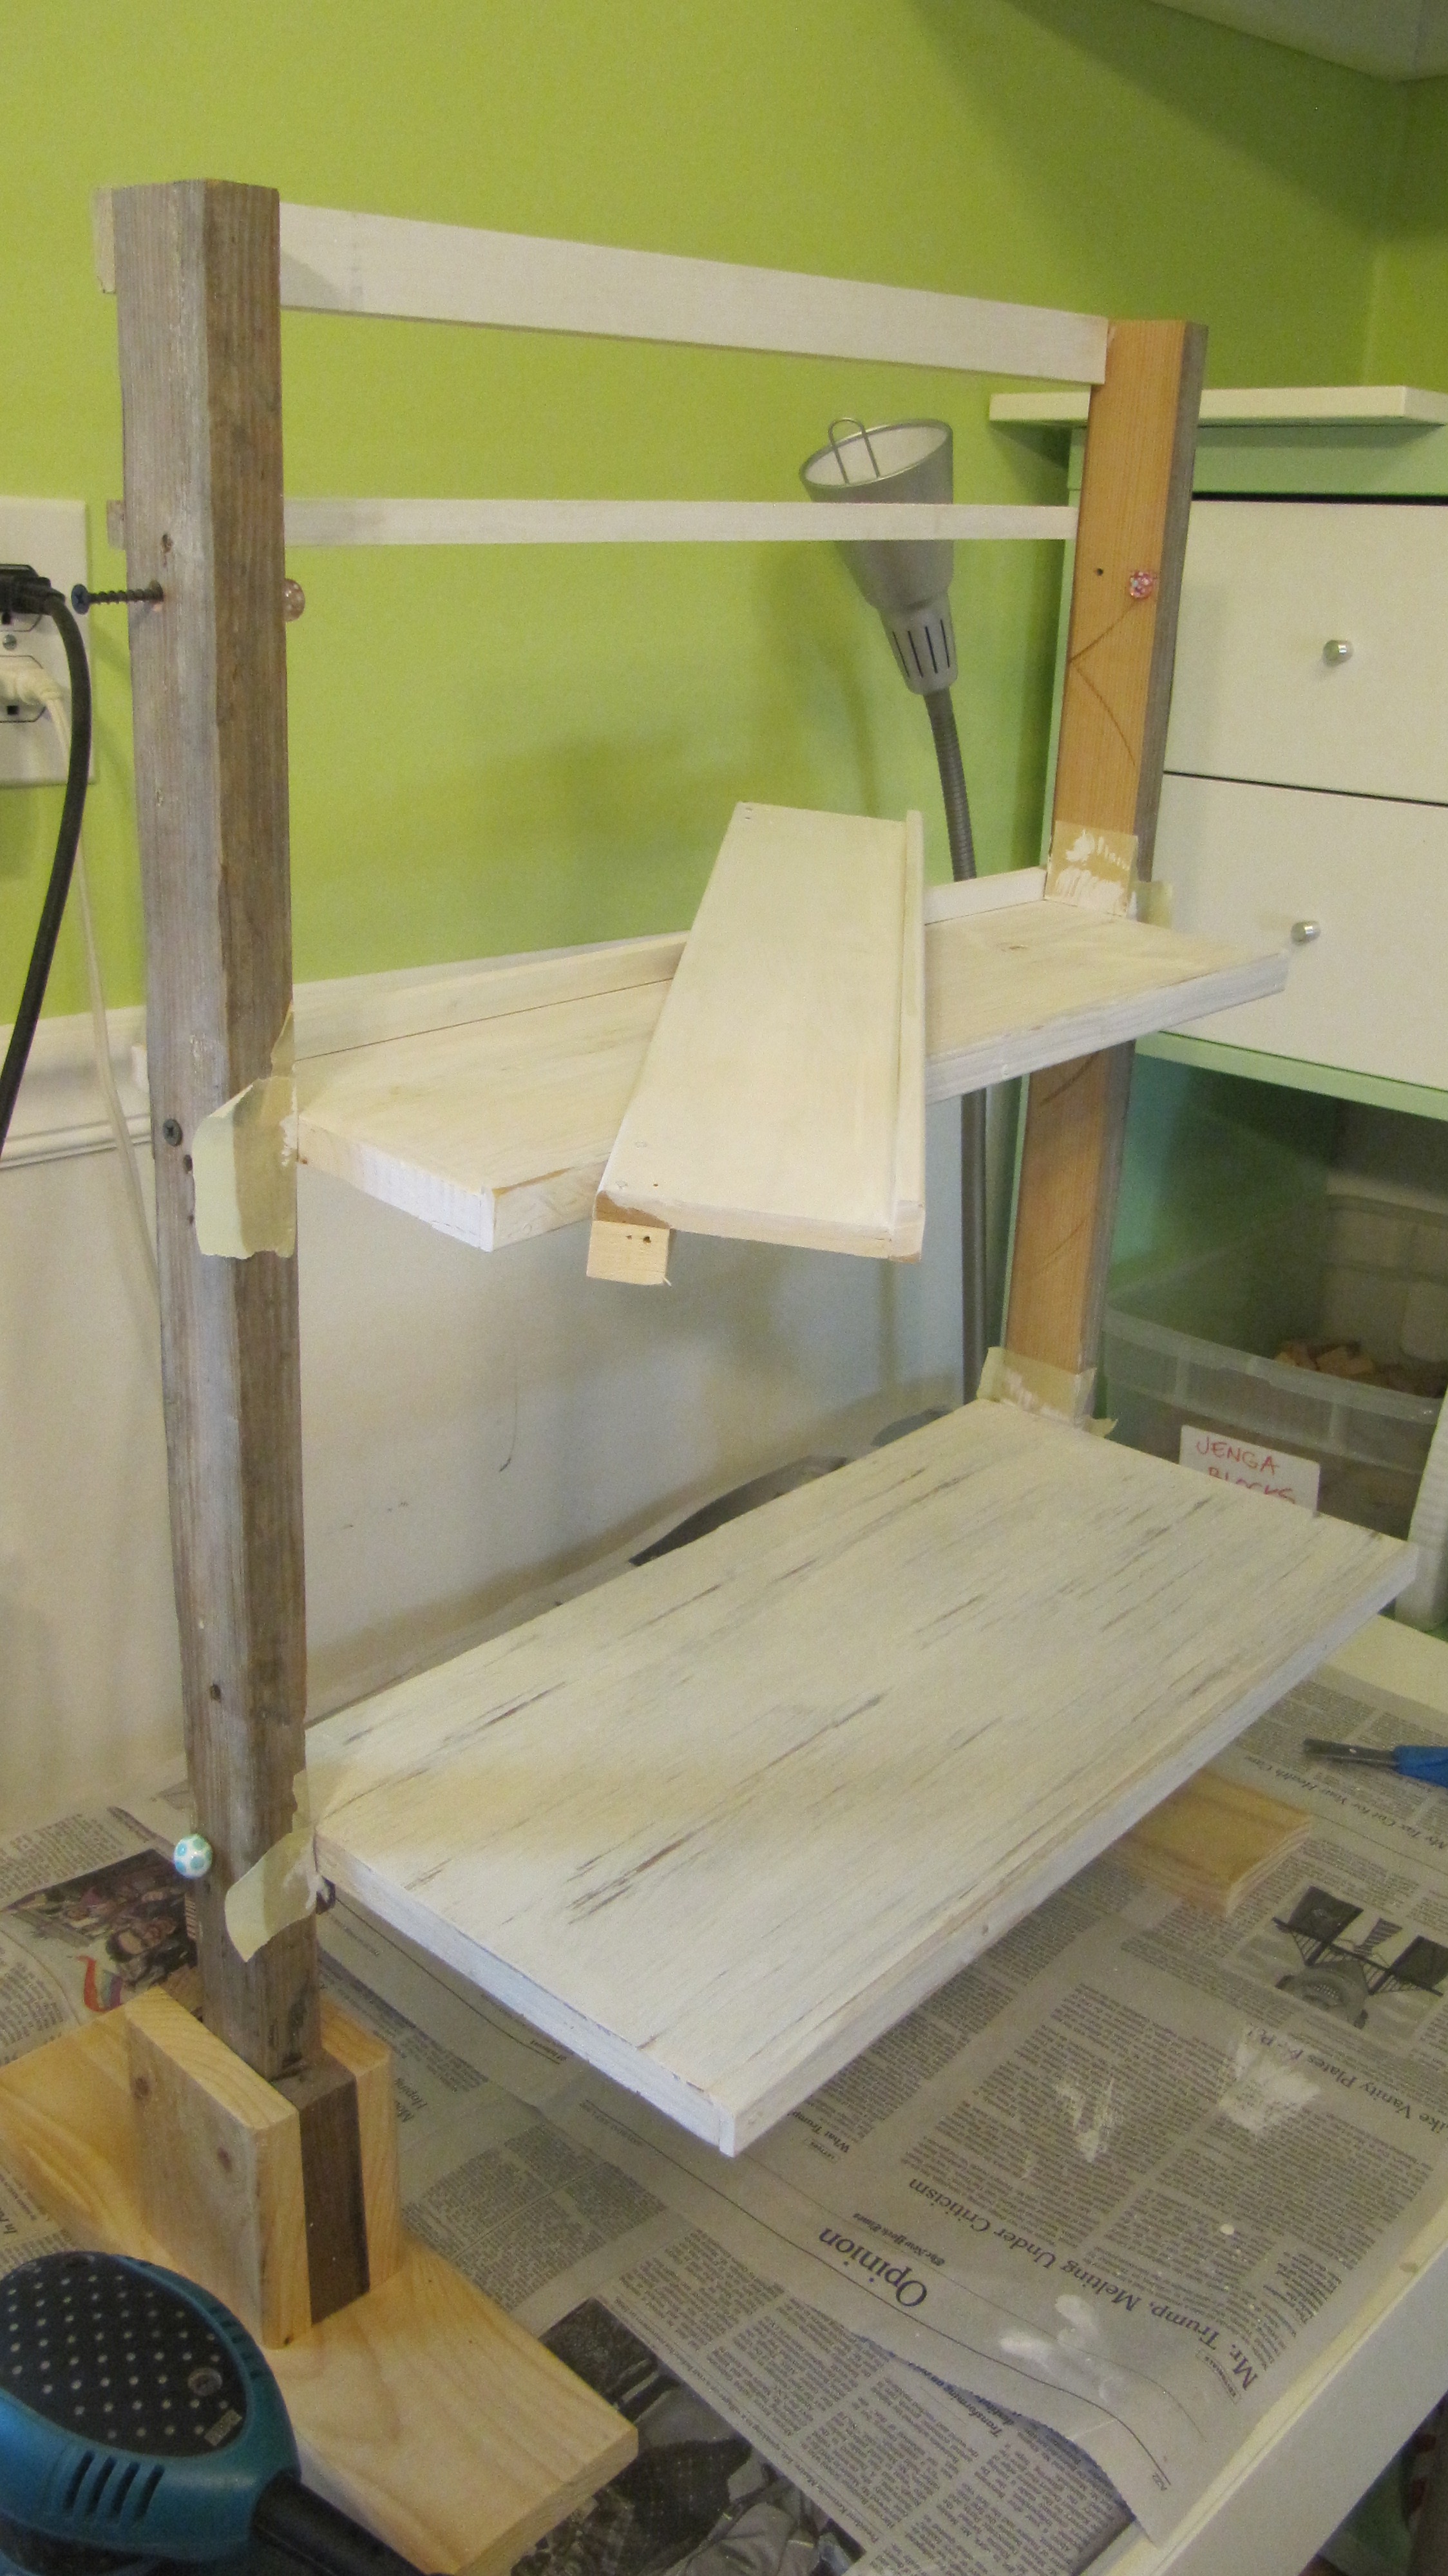
I decided to paint the shelves as the different kinds of wood was distracting from my boxes.  Just with gesso I already had in stock.  Note - sometimes I used my glass beads as shelf stoppers!

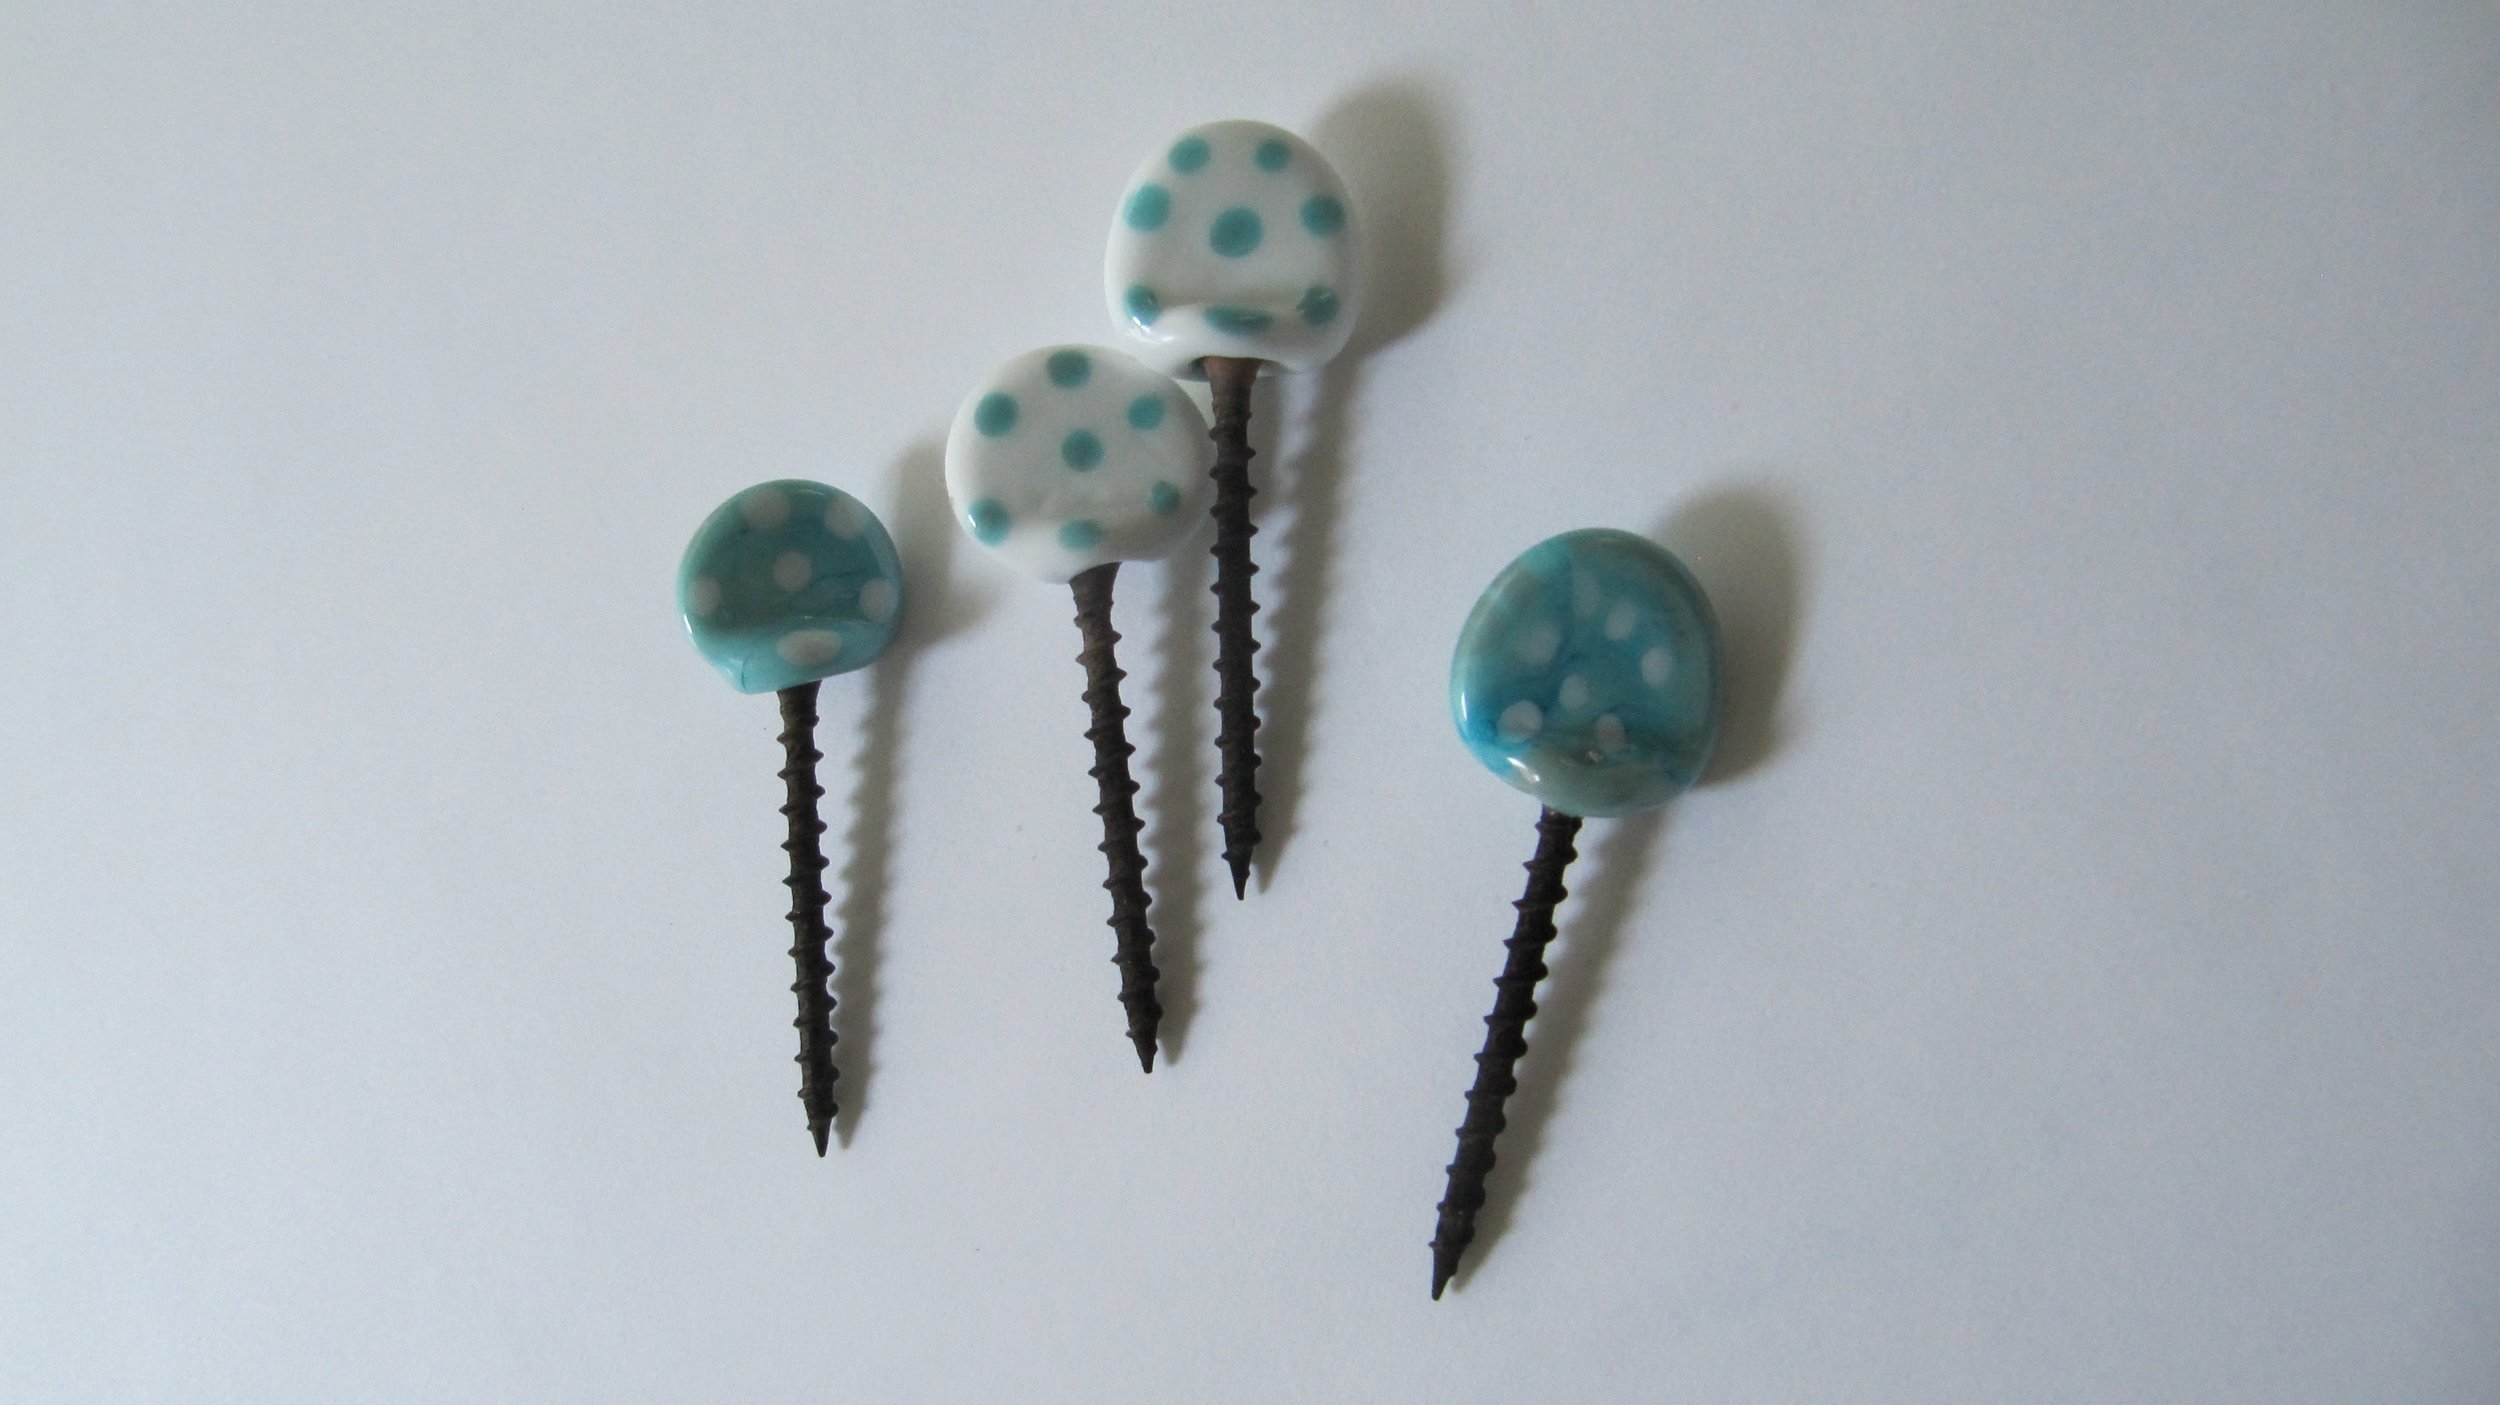
The legs were wobbly in the leg stands.  Amateur woodworker me had measured incorrectly and left too much room in them!  But I wanted to be able to make each display moveable on its own anyway, so I lampworked glass fins onto some wood screws, drilled holes into the backs of the leg stands, and used the finned screws to keep the legs in place and steady.  Fins are better than round knobs - they give you a better grip for turning.

The screws dig into the legs of the display and all are soundly but not permanently attached.  Yay!

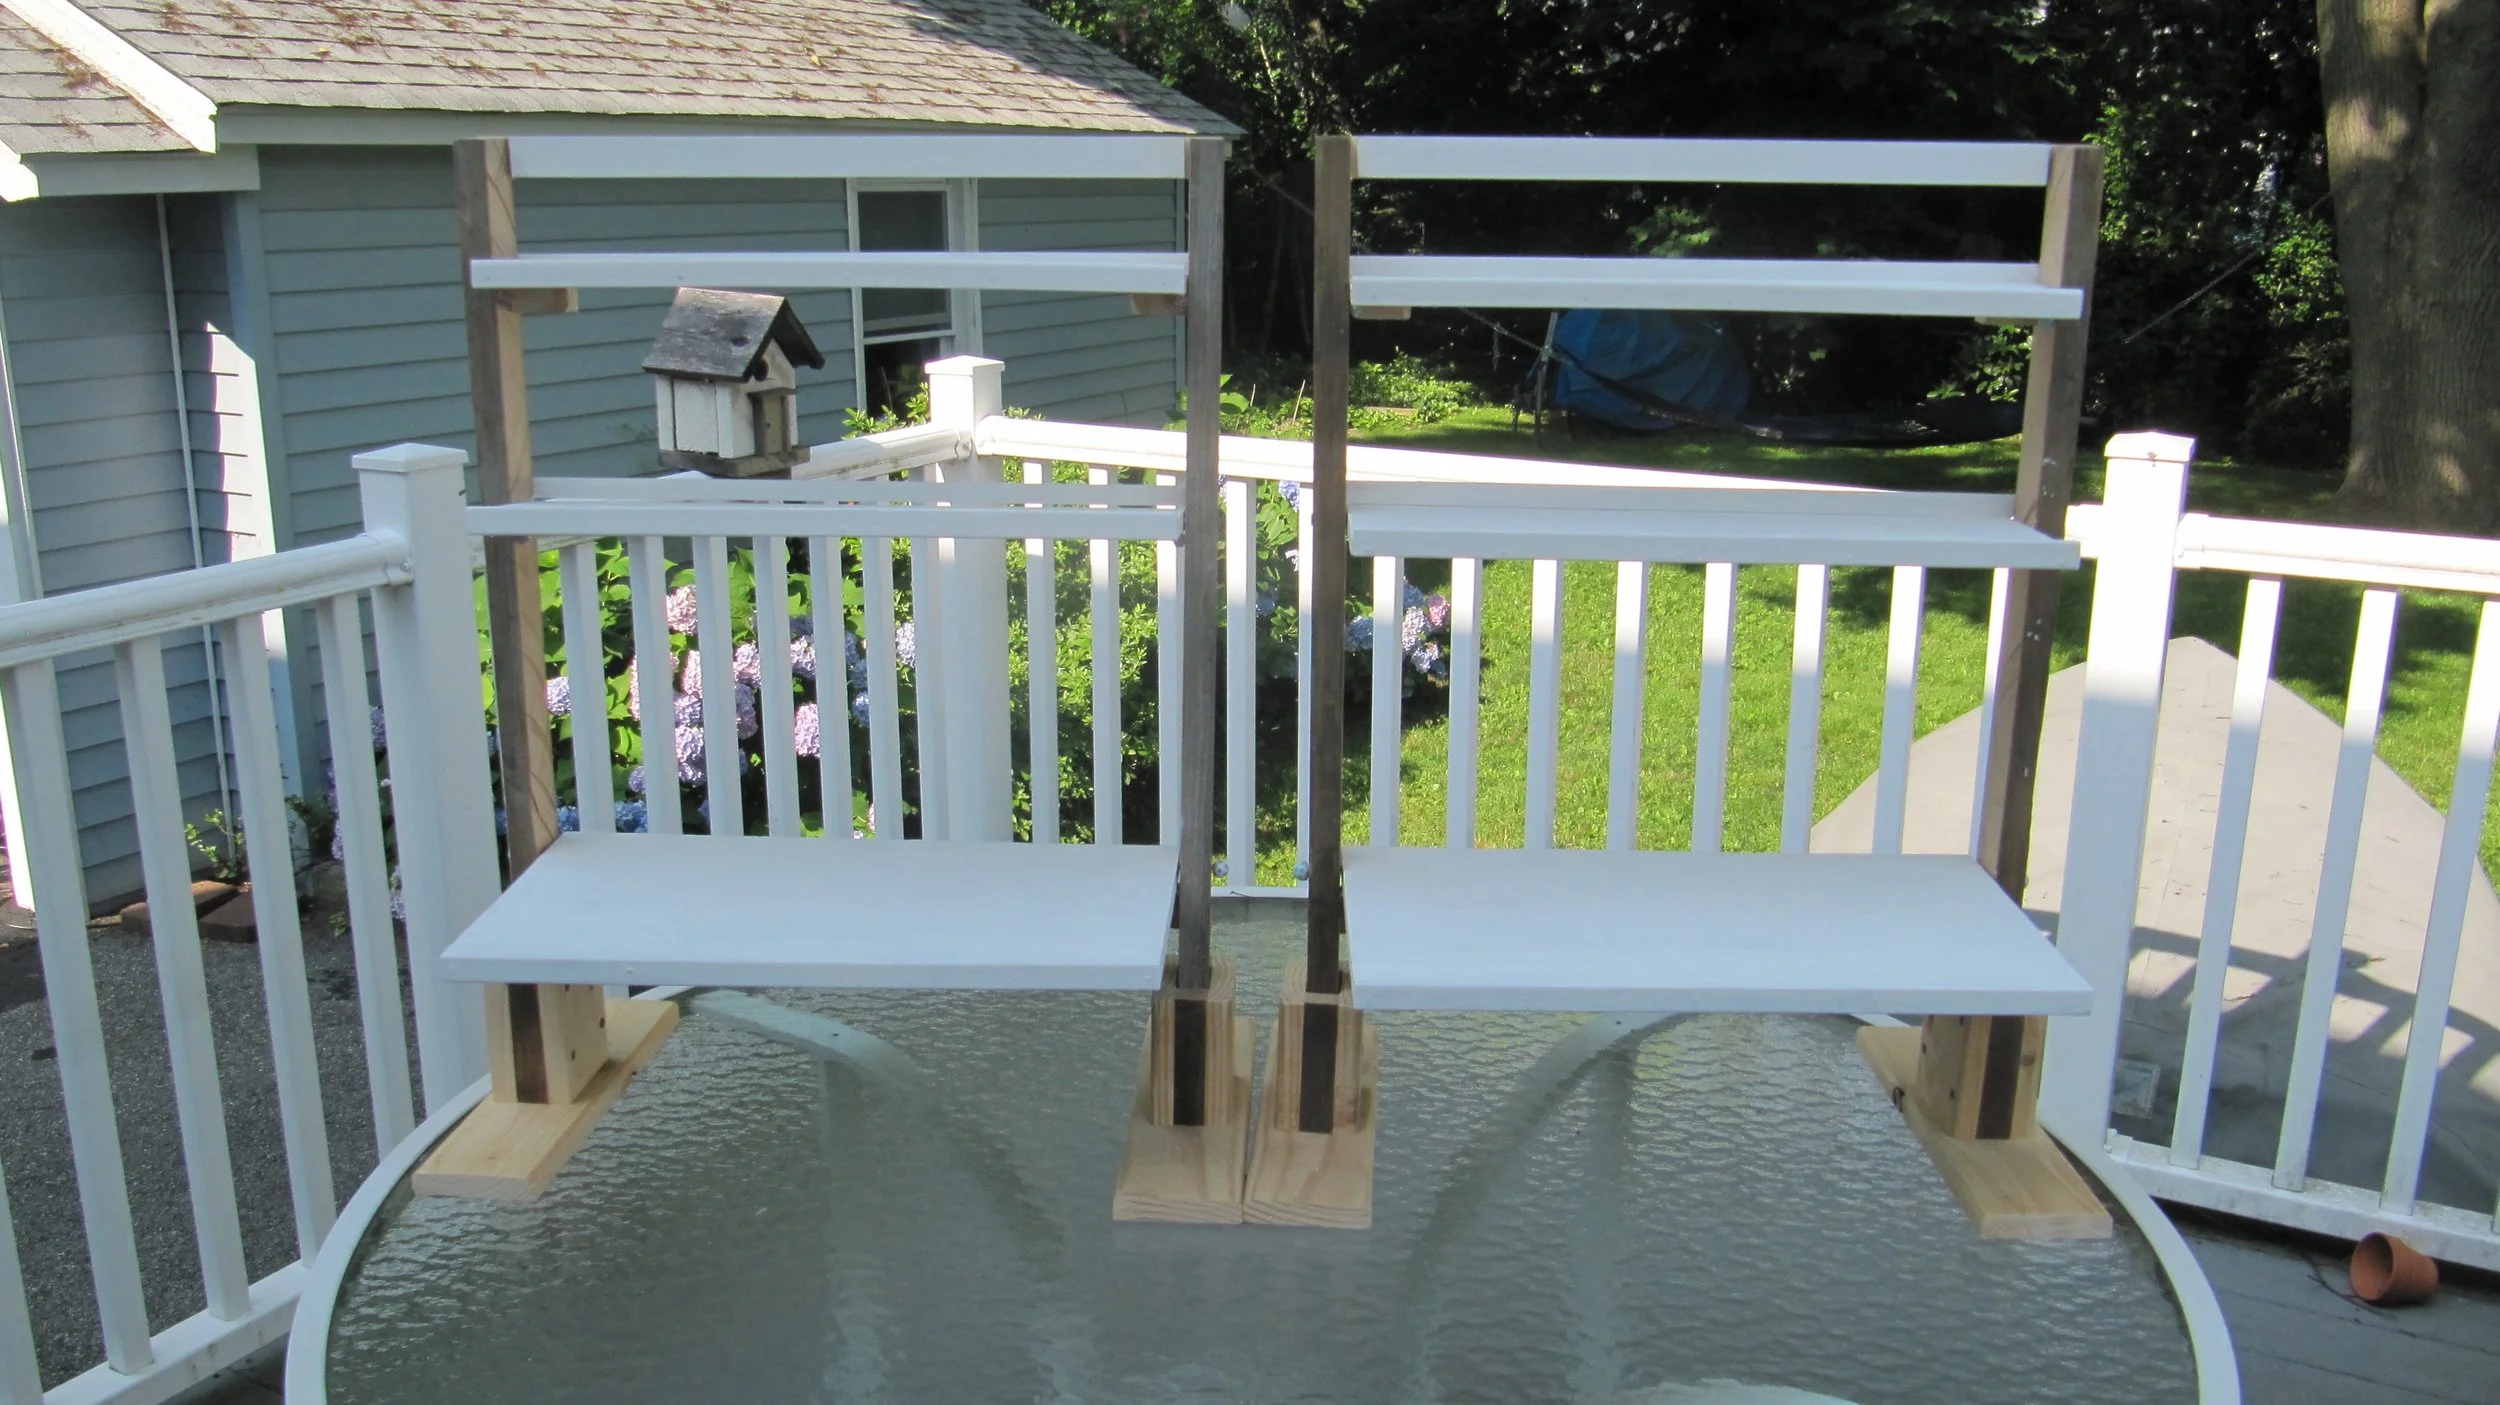
All folded up.  The two displays weigh about 15 pounds together.  Not a light weight display, but that was secondary to my requirements.

The finished display stands

What the display will look like when it is in use.

Unattached box toppers can be displayed on the very top rung by putting brass wires in the pre-drilled holes.  This is also an effective way to hang necklaces and jewelry for display.

Labyrinth or Maze?

There's something mesmerizing about labyrinths and mazes. Being immersed in solving a large-scale puzzle provides fascination as well as inspiration. However, there is a definite distinction between a labyrinth and a maze. Mazes are puzzles in which choices are made as to paths and directions. A labyrinth, however, is a single, meditative, path leading to the center through a series of concentric rings, known as circuits. One can think of a maze as a place to get lost, and a labyrinth as a place to find oneself. 

"Be Present" Labyrinth: Take a "walk" around this labyrinth with your finger to stimulate productivity.

Found all over the world since ancient times, labyrinths have a purpose: they are used as walking meditation, personal transformation, and a way to re-focus and stimulate creativity. Want to "walk" a labyrinth right now? Use your finger to trace the path to the center (and back out again) on the finger-labyrinth above.  

Need a break from the hustle and bustle of the city?  Take a walk in New York City's Battery Park, where you will find the hidden gem known as the "Labyrinth for Contemplation." 

Which do you prefer, a labyrinth, or a maze?

Nicoletta is a lifelong artist and art educator, with an M.A. in Art Education and Administration. She travels the world seeking cultural inspiration for her art, and has worked in fibers, acrylics, oils, and sculpture. Her current work is inspired by the reinvention of the mundane zipper, elevated to an art form into unexpected jewelry designs, and shown throughout the New York/New Jersey area as Artologie Zipper Jewelry.

While Visiting Family in Bangkok

I ATE SOME AMAZING FOOD AND SAW SITES I COULDN'T HAVE IMAGINED AND PLAYED WITH MY CUTE GRAND NEPHEW WHO IS JUST DISCOVERING ABOUT THE WORLD AROUND HIM

I'll start with some food. Rambutan is a relative of the Lychee so the flavor was similar. Mangosteen looks beautiful in its outer cover and is a segmented white fruit inside. Its full of antioxidants, fiber and vitamins. My nephew had vegetable and pork soup in Chinatown. The appetizer plate, Miang kham is eat onleaves..very tasty bite! Butterfly pea flower iced tea starts out blue but adding lime gives it the beautiful purple color. Finally delicious spicy soft shell crab curry, my favorite! 


Now for the sites. The Grand Palace is just that-Grand. It'smade up of numerous buildings, halls, pavilions set around open lawns, gardens and courtyards. There is more gold in this complex then I have ever seen, the statues are filled with details, heads on toes of feet, wings, gods, goddesses. Wat Pho - the Temple of the Reclining Budda is one of the largest and oldest temple complex in Thailand. the architecture is less extravagant but full of detail.

Of course everywhere you go someone is taking a selfie you couldn't find a more interesting spot

Went to Bali and Made a Bracelet

While in beautiful Ubud Bali last month I discovered the Pondok Pekak Library & Learning Center which offers private classes in traditional Balinese art & culture to travelers.

A list of classes can be found on their website http://www.pondokpekaklibrary.com/classes

I decided on the Silver jewelry making class although fruit and vegetable carving sounded fun. The teacher was from a close by town that specialized in jewelry making. After deciding on a bracelet design I went to work.

The tools were handmade and were really comfortable to work with. The torch ran on petrol and was kept going by pumping a bellows.

Demo of using the torch. A real challenge for the uncoordinated (me)

Small beads were added by placing them with a thin wooden stick on top of a layer of glue made from the seed of a local plant..the glue was only good for a day.

Once the paisleys were finished the band was added directly to the edge

After I oxcidized the background I polished it and it was added to my collection of bangles

Easy Recipe: Make Pesto Like a Pro

One of my favorite summer herbs is basil: its fragrant aroma and versatility makes it an irresistible ingredient in appetizers, salads, and main courses.  Find it available in bunches (with or without its roots), or as small plants, fresh and abundant at local farmer's markets. I grow some every year for my favorite basil pesto recipe, and I make extra to freeze for the winter. This year I  planted a 6 pack of small basil plants in an outdoor planter, which grew into 18-inch tall plants.  While I don't claim to have a green thumb, these plants yielded some beautiful basil leaves, which I picked for use in the recipe you see here. As with any recipe, be sure to use the freshest and best ingredients available for an amazing, delicious pesto!

Basil Pesto for 2

Ingredients:

  • 1/2 cup packed basil
  • 1 tablespoon pine nuts
  • 1 garlic clove
  • salt
  • 3 to 4 tablespoons olive oil
  • 1/3 cup freshly grated Parmigiano Reggiano cheese

Directions:

Combine the following ingredients together in a blender or food processor: basil, oil, garlic, pine nuts, and pinch of salt. (If doing this by hand using a mortar and pestle, pound the dry ingredients together first, then add the olive oil). 

Blend into a smooth green sauce. 

Transfer the mixture to a bowl. Stir in the cheese.

Prepare your favorite pasta. I usually follow the rule of thumb and make about 1/4 lb. per person. 

I prepared rotini pasta for this dish, which has a shape that holds the pesto really well. Add your pesto to hot pasta, using as much as you like. Also makes a great appetizer spread on toasted French bread. Store any extra in the fridge, but be sure to use it within a few days.

Tips for Freezing: Withhold the cheese to add later on, and freeze in small batches or cube sized containers for easy defrosting to add to favorite recipes.  Enjoy!

Post by: Nicoletta Siccone / ETSY Shop: ArtologieDesigns / Website: www.art-ologie.com

Nicoletta is a lifelong artist and art educator, with an M.A. in Art Education and Administration. She travels the world seeking cultural inspiration for her art, and has worked in fibers, acrylics, oils, and sculpture. Her current work is inspired by the reinvention of the mundane zipper, elevated to an art form into unexpected jewelry designs, and shown throughout the New York/New Jersey area as Artologie Zipper Jewelry.