March Printable: Happy Easter Banner


Yesterday our talented and longtime contributor Kerry of KBatty Designs shared her fun Easter card tutorial with you. Today her Easter banner will kick off our new series of printable downloads created by our Etsy Street Team for you. Use the banner to decorate your home, or to lend some spirit to you Easter brunch festivities.

You can download the complete banner here:


To assemble it follow these instructions:

  1. Print each page on card stock
  2. Trim out each 4 x 4inch square on the gray lines - use scissors, x-acto knife & ruler or paper cutter...whatever you prefer
  3. Use twill tape, ribbon, or twine to hang the banner. You can either tape twine to the back of each square, or more elegantly, punch a hole into each corner of the panels and thread twine or ribbon through each square. Use your imagination!
Quick Tip: Small removable hooks like these work really well for hanging your banner.


A big thank you to Kerry for sharing this with us and have fun with your banner!


Simone
groundsel.etsy.com


A Potato Stamp Tutorial :: Easter Cards


Easter is almost here! Do you celebrate? Want an easy craft to make part of the fun? When you get tired of dying all those eggs (did you see this post last week? Amazing!) pull out your spuds & have some fun with potato stamping. This is so easy it's criminal.


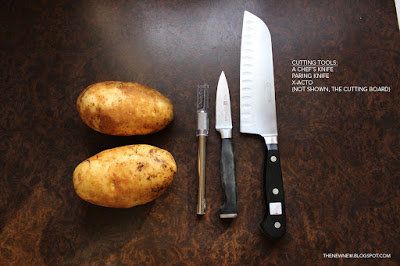
Here's what you need:
Potatoes (you can get several stamps from one potato, but if you have lots of stampers, a few would be a good idea)
Cutting tools such as: a chef's knife, paring knife - I also found my x-acto to be helpful
A cutting board
Stamp pads in fun Easter colors (found at any craft store)
Also optional a glue pad & glitter (but I recommend them as they were my favorite decoration)
Optional markers or pens to decorate the eggs
Paper to practice on
Paper to stamp on (you could also do this on envelopes!)
Paper towels! (not pictured but essential!!)

Also optional is a bowl of lemon water to leave your stamps in while you aren't using them. It keeps them from turning that red/brown that potatoes turn when they've been left out. Like apples. This didn't take very long so I didn't run into that problem.


**Also a note about the cutting tools: obviously you don't want to give kids a knife, so adults should do the cutting here. I did see one guy who used a plastic knife on his potatoes. Use your judgement on whether that is ok for your small ones. 

Oh, I should mention that I actually washed my potatoes first. Just in case there was any dirt on them, I didn't want it to bleed onto my stamp pad or my project.

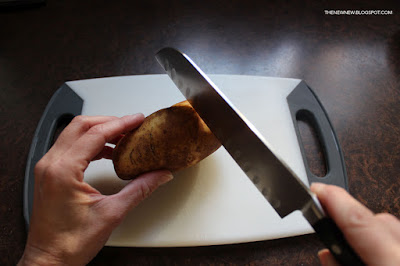
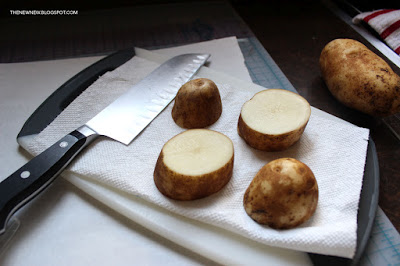
Step 1: cut your potato


Make sure that you slice straight down to get a flat surface for stamping or carving.

Depending on the size of your potato, you can make several stamps from one spud. I tried it. The variety was subtle but I liked it. Also, it gave me options for carving a few pieces & leaving other slices as whole "eggs". Multiple slices also give you multiple stamps for multiple hands. Great if you are stamping in company.
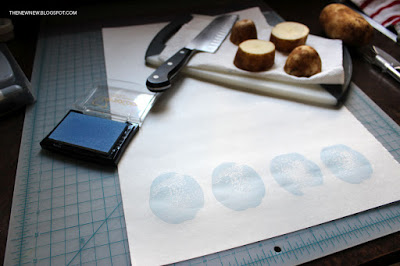

Step 2: practice

First, use a paper towel take off any excess water that comes out of your potato. To ink your spud, lightly dab it on the stamp pad just as you would a regular rubber stamp. These pick up plenty of ink.


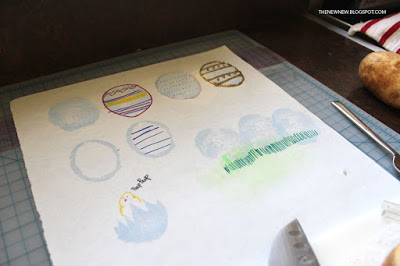
I never go straight to my nice paper. Always practice your impression. I found it helpful to really push down on the center of the slice for a relatively solid print. After a few stamps, I broke out the markers & decorating accessories to figure out what appealed to me. This also gave me other ideas for shapes to carve in my potatoes.


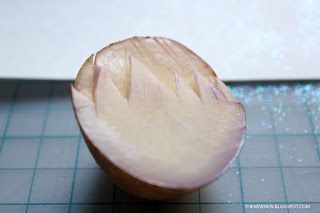
For the "broken egg" on the right, I used a pen & then my x-acto knife to randomly draw the broken pieces on my stamp. I'm sorry I didn't get a picture of the actual process, but this YouTube video shows a great example of how to get a stamp like this. You just carve away the parts of the potato that you don't want in your design.


Keep practicing until you are satisfied with a few ideas. It's easy to switch colors with potatoes. I just flipped my slice over or you can wipe off any extra ink. Keep those paper towels handy either way. It's easy to get the ink all over you & everything around you. Which is important to look out for in our next step...

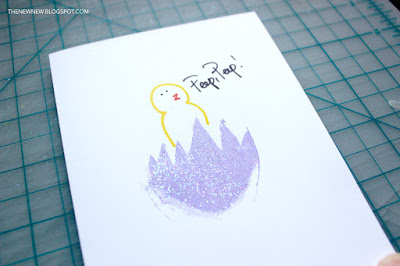
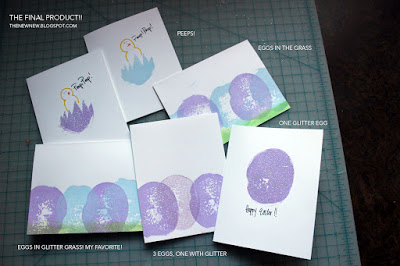
Step 3: Move to your card


After a few practice designs, I figured out what I wanted to stamp. A combo of colors & shapes on most of the cards made for a good look. I used the edge of my green pad to make grass for my "eggs" to sit in. Then came the glitter!!! I loved that the most. I stamped the color, then inked the same potato with the glue pad & stamped right over the same place again. Pour the glitter on, excess goes back in the container. Pretty!!!

Step 4: dry & clean up

This might be the best part. Make sure there aren't any little potato pieces on your stamp pads. Close them up.  Pitch the stamps in the trash. DONE! Make sure all your stamps are dry before putting them away or sending them off. Where I overstamped (2 colors over each other) they took about 10 minutes to dry.

Thanks for joining me! I hope you enjoy doing this project. It's SOOO easy. YouTube has tons of great videos on potato stamps if you're interested in other ideas. With different types of inks or paint, you could make napkins, notebooks, tshirts...Let me know what you create with your potato stamps!


Kerry
kbatty.etsy.com

Spring Colors Have Sprung!


 March 20th is the first official day of Spring. After yesterday, I really feel like the season is here already! It was 60!! Yeah!

Here are a few items that continue to get me in the mood with their bright colors...


Bright & spring-like...complete with April showers that will bring May Flowers. I love this print. Michelle has great prints in fabulous colors!


Is it me or is neon everywhere right now? Maybe I'm just looking for it. Anywho!  Hook And Matter has an entire shop section dedicated to neon necklaces. They are all fabulous! (Hello, Neon Wishbone!)


Full confession - this clutch was my inspiration for this post. Love it! I like anything that makes traveling easier & chic at the same time. Plus, check out the back strap for holding it. Great idea. It makes me think of the grass in the Spring. New & bright! And very soon littered with Easter Eggs!

{KOOKLA SAMPLES by Kookla Makeup}

I don't know about you but I think these look delicious! It makes me think of the first outdoor happy hour of the year...for some reason...maybe that is saying too much about myself...Anywho! What a great way to try several lip glosses & find your favorite.

Get out there & enjoy this early Spring!


Kerry :: kbatty.etsy.com

I set goals...now what?

{Rosie! The Biz Ladies cheerleader on Design Sponge}

The beginning of a new year means one thing. No, not hangovers! Ok, maybe those, but also everyone is talking about goal setting & I swear no one does it more than those of us in the handmade/small business category. All year long we are evaluating, changing, adjusting. This time of the year is prime for doing those things big picture style.

Got Goals?

Yes! But, now what? That's what I have struggled with in the past. How will I work toward these ideas every day? Last year my goals were to:

1. Produce more work
2. Focus. 

Kind of a do-more-by-doing-less approach there on number 2. Did I accomplish them? Yes...loosely. Mostly by sitting down & sketching out ideas. Many of them made it to the computer. Not many of them made it onto my shop, but design development takes time & I can't say it was easy to focus on one design at a time. So, can I do it differently? Well, yes...I'm glad you asked. Here's how...

New Year, New Strategy

I want to approach this goal setting/achieving differently this year. I don't want to load a bunch of pressure on myself, but my custom business grew leaps this year & I want to keep that momentum going. It's important to me to have a plan of attack. Here are a few links & tricks I've found helpful so far:

Designing an MBA: 4 Steps to your Best Business Year

Hello point number 1! Pick one point of focus because when you have a clearly defined point of focus, making those decisions becomes a whole lot easier. It's really a recycling of my goal last year, but now I see a better way to achieve it. My strategy is going to be break my focal points down by quarters. One point for the whole year is scary & feels like I'm climbing a mountain. I got a lot of mountains to climb!

Heartmade: Life is Messy Planners 2.0

Yes, these helpful worksheets are $40, but I need some ways to break down what I do each day/week. A $40 investment vs the money I will make if these work for me = no brainer to try them. Plus, who doesn't want to look at Mayi Carles little illustrations every day?

Rena Tom: Visions of a New Year

I have a big bulletin board above my desk (this one, actually, in case one of your goals is to redecorate your office space. Love!). WomansMedia.com suggests that visualizing yourself achieving your goals is half the battle. Done.

Clearly the World Wide Web has millions of sources for goal setting (pls share yours in the comments!!) and these are 3 places I have found helpful. The aforementioned article I read on Woman's Media.com noted that research shows people who write down their goals are more likely to achieve them. So, while there is not a right or wrong way to plan & execute your goals (see number 2 in the Designing an MBA article), writing them down seems like a good place to start. It certainly makes them easier to reference during the year.

Don't think that I didn't notice that I haven't actually stated my 2012 goals in this post. I know. They are still under refinement. I can't just say "I'm going to conquer the world!" and focus on it. So, I'm further breaking them down. Stay tuned. I'll see you back here for goal specifics in my next post & updates through out the year.

Best wishes & blessings for all our blogging/crafting community. Happy New Year, Everyone! 

Kerry


Sending Out Christmas Cards

This time of the year I get that spoof Christmas song in my head based on the 12 Days of Christmas. You know it...the 12 Pains of Christmas. The Fourth thing at Christmas that's such a pain to most people is sending Christmas cards.

What? Why?! Obviously as a stationery maker, I look forward to sending AND receiving holiday cards, but I can understand...it's one more thing to do & an easy one to leave to the last minute. So! Here are some quick ways to get them done - all great cards that you can print at home!

Printable Christmas Card - Bird Wreath Greeting with Personalization Option


Last Chance Printable Christmas Cards DIY Digital File Deer Reindeer Antlers Woodland


Custom Printable Christmas Card Design


Sending Smiles :: Holiday Photo Cards

The above screen shot is of THIS treasury I did a few weeks ago. All of the items featured are photo holiday cards that you can print yourself. That's what I'm doing! Well, that's what I'm doing in the sense that I am taking my thumbdrive to CVS up the street & getting 5 x 7 prints made. Want to see??

{design by me, photo by NewNew member Kelley Gudahl}

Now all you need are envelopes! Hope your holidays are Merry & Bright!

Kerry


NewNew Treasuries on Etsy


I have a joke for you today: How many computers does it take to write a blog post? If I actually get this up on the internet, the answer is 4...well, 3 and an iPad. And you have to crash one of the computers. Today is off to a great start!

So! Let's talk NewNew Treasuries! Treasuries are lists of items, curated by Etsy members. You can be a seller or a buyer to create them - treasuries don't discriminate! It's a fun way to bring items that you're interested together under a theme. Think of them as a bit like Pinterest but just for Etsy.

Well, we have a whole team of members who put these lists together each day. I'm giving them a virtual high-5 right now. Perhaps it's just me but these lists are time consuming & these ladies & gentlemen crank them out. They deserve props.

How do you find them? On the Etsy homepage, you can navigate to the Treasuries front page (scroll down, check the left hand column). Once there, search "newnewteam" and VOILA! Treasuries appear from your fave NewNew peeps & including NewNew sellers. You can favorite a treasury, "like" it on Facebook, tweet about it, or if there are just a few items you like, you can "heart" them right there on the treasury. Don't forget to comment!

Here are a few recent lists. Sorry for the lack of visuals. Refer to paragraph one.

Hello Autumn by lamusekalliope
October Birthstone by ChelseaRainbow
Autumn Wool by asterknot
Civil Disobedience on the The Brooklyn Bridge by dslookkin

We cover all topics as you can see. So, come check out our awesome treasuries! I promise I'll be back with stunning visuals in the next post. This really doesn't do our team justice. Gotta run before I crash my second computer before lunch...